![]()
Sponsored By
ROCK
HARDWARE
| Centurion Walls, Grampians [ Overview | Images | Map | PDF | Old Version | Forum | Trip Reports ] |
|
||||||||||||||||||||||||
![]() [
This guide contributed by Neil Monteith. Disclaimer: Rock climbing is a
dangerous sport. None of the information contained in this document has
been verified. Treat all fixed gear with suspicion, route grades may be
incorrect and the rock may be poor. The editors of this document take no
responsibility for any injury arising from the use of this information. If
there are mistakes in this guide then let the editor know by emailing
nmoneith@yahoo.com. Download
printer friendly PDF version. ]
[
This guide contributed by Neil Monteith. Disclaimer: Rock climbing is a
dangerous sport. None of the information contained in this document has
been verified. Treat all fixed gear with suspicion, route grades may be
incorrect and the rock may be poor. The editors of this document take no
responsibility for any injury arising from the use of this information. If
there are mistakes in this guide then let the editor know by emailing
nmoneith@yahoo.com. Download
printer friendly PDF version. ]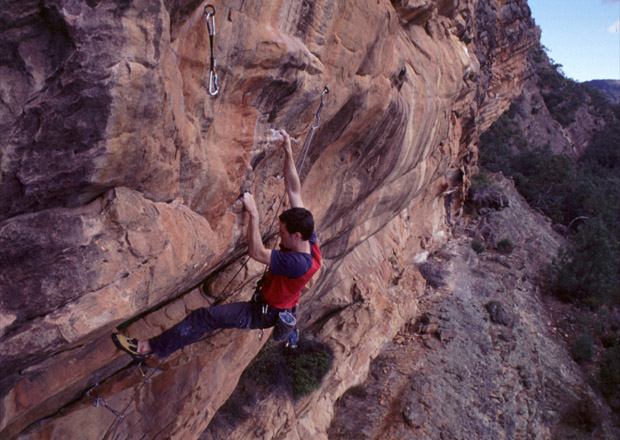
*** This text is now out of date. See: June 2006 Updated PDF
This is a new semi-sport crag located
in the Northern Grampians in Victoria. The rock is steep orange sandstone
walls with
the occasional cave thrown in for good measure. Most of the better routes
are grade 20+ and protected mainly by bolts. The fixed equipment used on
this cliff are either stainless steel expansion bolts or glue-in
ringbolts. Most climbs have rap anchors to facilitate easy descent and
cleaning. The first ascentionists have endeavoured to camouflage fixed
equipment by painting hangers and rings with matt textured paint. The
first bolts on routes are usually relatively high off the deck so a stick
clip is useful.
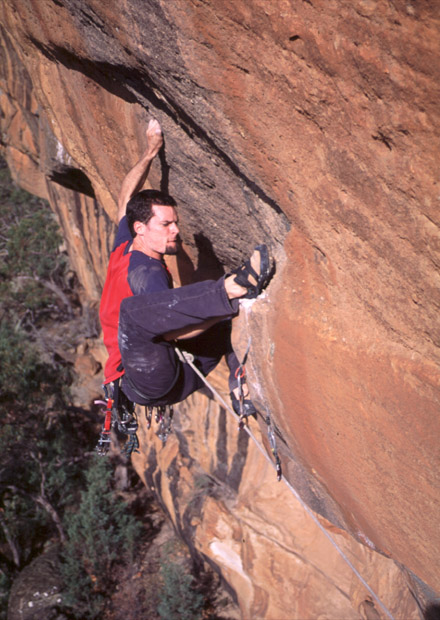
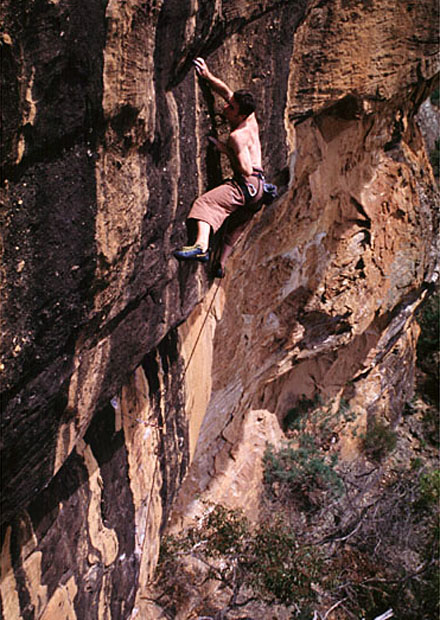
Right: Nick McKinnon on Killer Wolf (21). All photos on this page by Neil Monteith.
 Much
of the rock is soft, so try and avoid climbing within 24 hours of recent
rain. Routes such as Winged Corpse, Psychotic Episode and Killer Wolf are
good wet weather routes. Black streaks on the rock are marks of water
seepage which means these routes are not climbable after heavy rain. A
light rack of gear is required for many of the routes - a single set of
cams and wires will suffice on all apart from Kublai Khan or Stone
Temptress. There is still some potential for new lines to be done.
Much
of the rock is soft, so try and avoid climbing within 24 hours of recent
rain. Routes such as Winged Corpse, Psychotic Episode and Killer Wolf are
good wet weather routes. Black streaks on the rock are marks of water
seepage which means these routes are not climbable after heavy rain. A
light rack of gear is required for many of the routes - a single set of
cams and wires will suffice on all apart from Kublai Khan or Stone
Temptress. There is still some potential for new lines to be done.
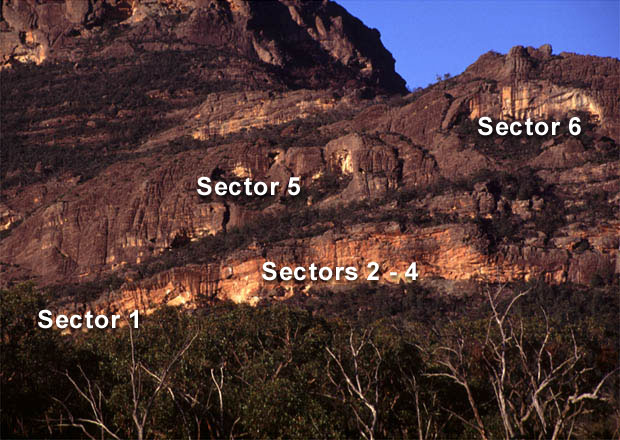
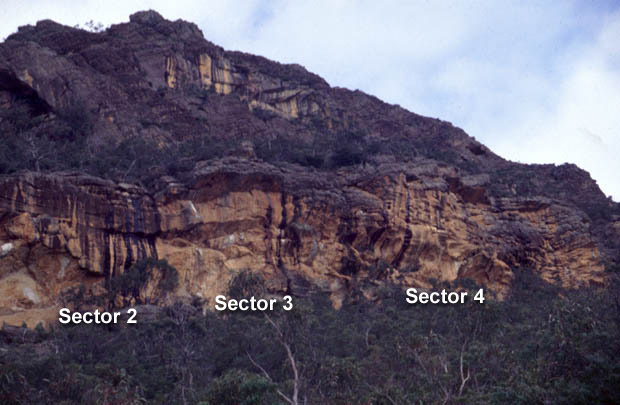
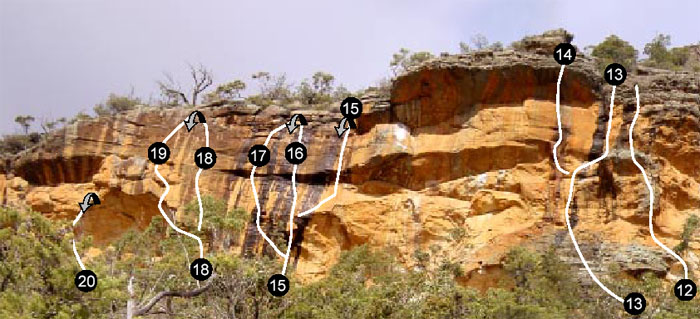
Above Left: View of Centurion Walls. The best routes are in the Lower Centurion Wall, primarily sector 2 & 4, while the Upper Centurion Wall (sectors 5 & 6) contains some more chossy lines.
ACCESS ![]()
GR 299066. These cliffs are in the
Mt Difficult Range (Nth Grampians), in Victoria, Australia. From Melbourne
drive to Stawell and continue north towards Horsham for about 15 minutes
then take the well signposted sign left to Roses Gap. If you drive past
the big koala you have gone too far. Approx 10km down this road just
before Roses Gap turn left down Roses Gap/Mt Zero Road
heading south for 1.2 km (24km north from Delley’s Bridge). Up on the R is
an obvious orange wall with a large grey wall above. The upper wall has a
very obvious arch formation. Find a rock cairn marking the start of the
access track. Follow occasional marker tape and rock cairns for about 15
minutes, walking through light scrub to arrive at the centre of the Lower
Wall.
If you want to camp the two best bets are the Fire Dam about 500m along
Halls Gap/Mt Zero Rd from Roses Gap or Troopers Creek campsite (payment
required) which is several kilometres west along Roses Gap Rd. You can
also camp in a sheltered sandy cave to the right of Progressive Happy
House at the cliff.
Above Left: Lower Centurion Wall. Routes are listed from right to left. The first
route climbs the orange overhung wall about 10m right of the impressive ring
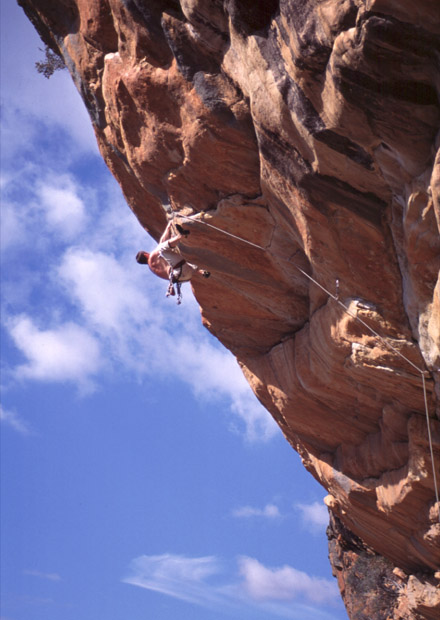
bolted buttress of Psychotic Episode (26). Above Right: Neil Monteith on Psychotic Episode (26)
Photo Kathy Dicker.
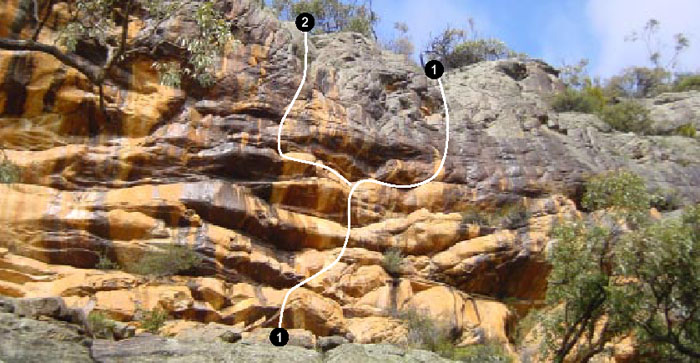
1] Progressive Happy House 15m 18 *
The best of the easy trad routes of the cliff. Head diagonally right on
big horizontal breaks to vertical reachy transition. Up easily to top and
tree belay. Bring lots of cams. Rap off tree above Push It Upstairs. FFA
Neil Monteith, Jono Schmidt & Nick McKinnon 25th June 2000
2] Push It Upstairs 15m 23
Sandbag one move wonder. Starts the same as PHH. Move up on big
horizontals for 7m . Traverse left for 3m and up to another good slot.
Dyno crux then up wall to belay tree. Rap off tree to descend. FFA Nick
McKinnon & Neil Monteith 1st May 1999
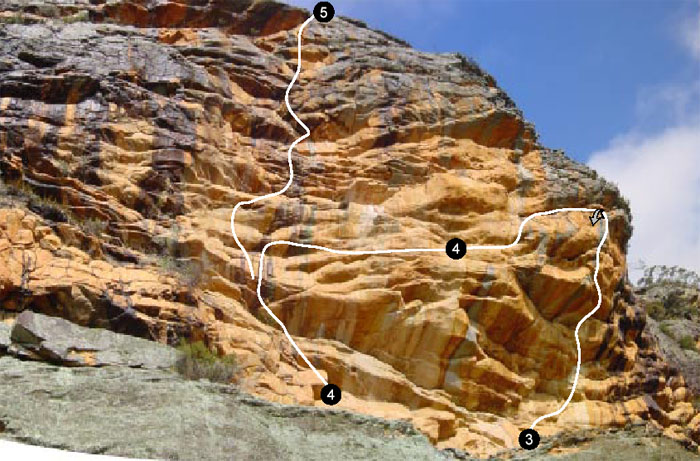
3] Psychotic Episode 15m 26 ***
The best line of the cliff. Flakes leading up overhung orange
buttress. Four rings leads to double ring lower-off. FFA Nick McKinnon
29th July 2000
4] Stone Temptress 20m 22 **
A super pumper traverse. Start up Kublia Khan for four metres then
begin the never ending overhung hand-traverse right on superb stone to end
at Psychotic Episode’s lower-off ring bolts. Bring every cam you own up to
size 4, and lots of slings. FFA Neil Monteith 5th November 2000
5] Kublai Khan 30m 21 *
Old guard route with powerful climbing through steep territory. Start
about 10m L of PE. Climb orange and black striped rock to first overhang.
Traverse 3m L then up steeply until a traverse line leads back R between
more overhangs. Committing moves over the next overhang lead to a dark red
patch of rock and a hanging corner/weakness. Up this and finish out right
of the summit roof. Rap off tree on ledge (25m rope reaches ground). FFA
Keith Lockwood& Norm Booth 3rd November 1996
6] Ghengis Khan 35m 19
Interesting wall climbing with some suspect rock. Starts about 7m L of
KK at the left most black streak that reaches the ground (flows out of a
small wind blown scoop immediately L of a large pile of boulders). Up 4m
to the small bush on R. Traverse L for 4m along the break then straight up
the wall above to finish just L of the dead tree at the top of the cliff.
FFA Campbell Mercer & Alan Hope 4th November 1995
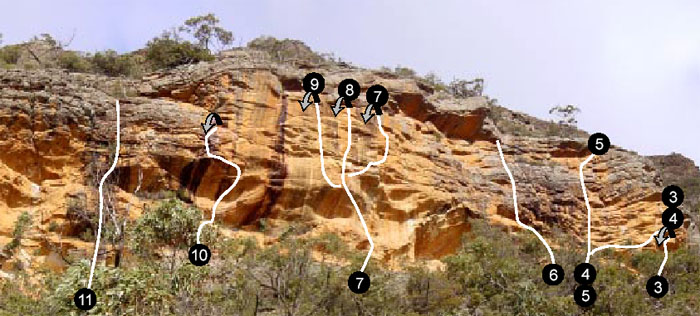
7] Anti-Christ Superstar 20m 25 *
Wandery climbing on great rock. Start 20m left of Ghengis Khan below
large scoop in rock. Up broken wall past BR to scoop. Follow five rings
left across steep wall (crux) to big break. Shuffle right along this for a
few moves (2 rings) to no hands rest in slot. Straight up a few moves to
twin pocket jugs then right (ignore high ring) to break and good cam slot.
Up again on pockets to jugs and pumpy conclusion past last ring to double
ring lower off. Extend runners to avoid rope drag. FFA Neil Monteith &
Nick McKinnon 2.9.2001
8] Compressor Route 23m 27 ** (S)
A long route with a sting in the tail. Starts as for Anti-Christ
Superstar but takes a direct finish up the pocketed head-wall. Climb ACS
to sixth ring and horizontal break. Fire up face above to big pocket.
Crimping crux finish through bulge leads to chains. 9 RB’s and chain lower
off. FFA Nick McKinnon 17th August 2002
9] Devilled Haircut 25m 25/26 ** (S)
Absorbing and powerful sport climbing up nice orange rock. Climb
Compressor Route to fifth RB. Step left under block (RB) and fire up
excellent wall above (three RB’s) with some nice big pockets to DRB
loweroff. FFA Neil Monteith 7.9.2003
10] Killer Wolf 15m 21 **
Best warm-up of the cliff which seeps heavily after rain. The scoop
and roof about 15m left of CR. Into small cave (FH), roof flake (cams) to
small stance and FH. Head left on jugs past hard to clip RB then straight
up to DRB. The direct finish straight up from second FH is an open
project. FFA Nick McKinnon, Neil Monteith & Adam Demmert 4th June 2000
11] Lexicon 25m 17
Looks appalling. Up the centre of the black streak 10m left of Killer
Wolf through two overhangs and finishing up R of the small bush at two
thirds height. FFA Campbell Mercer, Allan Hope & Mike Mulcairn 4th
November 1999
12] Liberator 30m 19
A nice feature spoilt by a scary start and less than great rock. Take
the RH arête of the small buttress 5m L of Lexicon. Scramble in to start
across choss from the right. Up arête steeply to the ledge and then up
face above on jugs. To avoid rope drag you can split this into two short
pitches. FFA Campbell Mercer & Mark Poustie 6th November 1995
13] Shades of Black 25m 16
The first route done on the cliff. Steep bold climbing on outrageous
holds and quite a bit of bird shit. Starts 7m L of Liberator at a very
small section of "brain" like rock at RH end of small white cave. Straight
up to LH side of buttress. Up flake on L then up and R to top of buttress.
Straight up wall above. FFA Campbell Mercer, Peter Watling, Allan Hope &
Mike Mulcairn 4th November 1995
Above Left: Nick McKinnon on Damage Done (24)
Photo Neil Monteith.
Above Right: Nick McKinnon on the FFA of Left Hand Black (23).
14] Damage Done 30m 24 *
Amazing exposure and unlikely moves on upper wall which is spoilt by a
crappy start. Start up Shades of Black and climb it to the bird shit
stained ledge at about 20m height. Hand traverse left here and head up
pocketed wall past a FH to under big roof. Monkey across this past another
FH to finish. Bring medium wires and cams. FFA Neil Monteith & Tom Briggs
(UK) 5th December 1998
15] Afterworld 20m 23 *
Sustained steep climbing. Starts up left side of cave about 30m left
of DD. An easier variant finish to Left Hand Black. Climb LHB to third FH
then traverse right past another FH to break in roof. Over roof on jugs
(FH), then up orange corner and final steep wall to rap anchor. Wires and
medium cams protect the upper half. The direct start has been attempted on
top-rope. FFA Neil Monteith & Aaron Jones March 2000
16] Left Hand Black 18m 23 ** (S)
A popular sustained sport route. Named after black pattern on rock.
The route climbs the left arête of cave, continues directly up orange face
and then over a roof to finish on excellent pockets. 5 FH’s and rap chain.
FFA Nick McKinnon & Neil Monteith 7th November 1998
17] Centrifugal Force 18m 24 **
The beautiful black streaked wall left of LHB. Start as for LHB to
first bolt then bouldery traverse left to jugs. From the break continue up
past a further three bolts and assorted wires. Last ring bolt was placed
after first ascent. Rap from chains above LHB. FFA Neil Monteith & Adam
Demmertt 21st November 1998
A good limited bouldering wall exists between Left Hand Black and Sandpit. The obvious problems were established by Tom Briggs, Neil Monteith and Gareth Llewellin on 5th December 1998. Additional V6 problem up ‘penis’ feature was added by Adam Demmert on 3rd June 2000.
18] Sandpit 18m 20
The obvious loose flake crack 5m left of CF. A single bolt offers the
only really good protection on this wall. Rap off chains. Recommended only
as a toprope. FFA Neil Monteith & Thomas Wimmer February 1999
19] Ton Steine Scherben 25m 24
Novel undercling roof lip traverse with some skanky rock. Climbs the
lip of the cave left of Sandpit and finishes up the headwall above. Crux
is getting from the roof into the small corner via shoulder busting mantle
pull. 5 FH’s and some wires. Rap off chain. FFA Thomas Wimmer & Neil
Monteith February 1999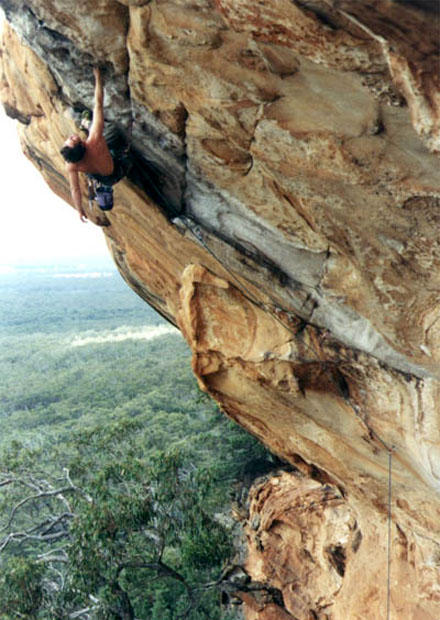
20] Winged Corpse 15m 26 **
Dubious start to otherwise excellent climb. Wild overhung steepness
through cave left of TSS. Stickclip very high FH then funkness leads up
flakes and pockets to DRB. Bouldery from start to finish. Four FH’s in
all. FFA Neil Monteith & Cameron Fairbairn 22nd April 2000
Right: Neil Monteith on the FFA of Winged Corpse (26).
30m up and left of Winged Corpse is the juggy grade 2 access route to the top of the cliff. A short fixed rope is in place. Leftwards from here is an assortment of average quality easy routes. There is potential for more if you are into that sort of thing.
21] Massacres and Maniacs 18m 15
About 40m left of fixed rope in scoop. Up scoop to ledge. Traverse L
3m up crack to roof. Out right and up wall. FFA Campbell Mercer & Peter
Watling 6th November 1995
22] HCP 14m 12
A Hyper-classic
Choss Pile? Up black wall left of MM and then V groove above. FFA Mark
Poustie & Campbell Mercer 6th November 1995.
23] Lunchbox Legend 14m 18
24] AA 24m 11
These are all choss routes and are not recommended. In the upper wall there is a large cave towards the RH end. To the R of this is a thin buttress flanked on its RH side by a smooth wall. Between the thin buttress and the smooth wall is a wide crack. This is Centurion.
25] Centurion 40m 9
26] BB 30m 10
27] Desert Crack 20m A2
On the far right side of the chossy cave is a very obvious overhanging
finger crack. Aid this using cams to size #1 and some birdbeaks for the
top. Might go free at grade 25? Rap off sling. FA Neil Monteith (solo)
26th November 2000
Further Reading: ![]()
Centurion Walls - Neil Monteiths web site, for more pics and latest
updates on Centurion Walls.
Home | Guide | Gallery | Tech Tips | Dictionary | Forum | Links | About | Search
Please read the full disclaimer before using any information contained on these pages.
All text, images and video on this site are copyright. Unauthorised use is strictly prohibited.