![]()
Sponsored By
ROCK
HARDWARE
Cordelette
 For Equalising Anchors
(Chockstone does not take any responsibility for the
accuracy of this article, or it's suitability for the purpose. Use at your
own risk. Chockstone Photography | Landscape Photography Australia | Australian Landscape Photography
Please read the full disclaimer)
You're leading the last pitch. It's been a long day and now the sun is setting. Topping out you glance around for potential belay anchors. The trad options aren't obvious. Ten minutes later you're still dicking around, shortening slings, shifting clove hitches, tying off portions of the climbing rope. It's a mess and the damn anchors still don't look equalised. What's more that comfy seat has a spike of rock that is threatening your future plans for fatherhood. No time to shift it now.... "On belay!"
If only there was a faster, simpler way? Well there is. Enter the "cordelette". It's hardly a new concept, and despite the ease with which it can equalise anchors the cordelette is still, somewhat surprisingly, not yet on everyone's rack. For trad multi-pitch I carry two, one for the belay at the bottom of a pitch and one for the belay at the top.
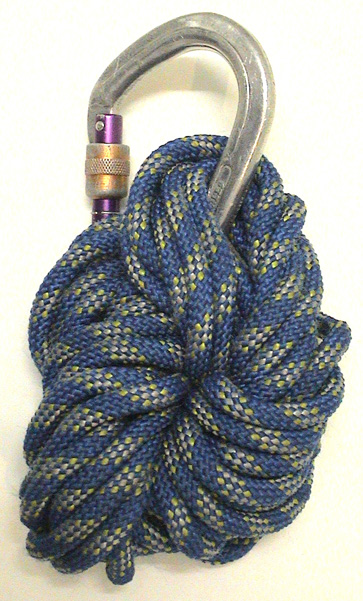
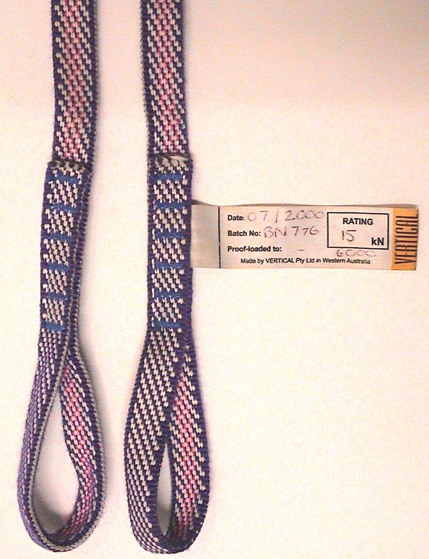
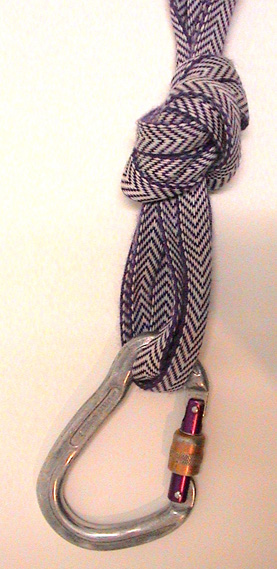
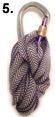
Above Right: A cordelette made from 6 metres of 7mm accessory cord and twist racked. Below Right: The "Eyes" of a snake cordelette made from webbing.
 The cordelette is just a large sling, 6 or so metres
in length. To create one on the cheap it can be made from 7mm or thicker
accessory cord (perlon) tied in a loop with a triple fisherman's knot (as for double fishermans, but
with an extra stopper knot on each side). A
little dearer you could also use, for example, 5.5mm Blue Water Titan
(spectra) cord. The disadvantage with cord is that it can become twisted (pig
tailing), fairly easily and depending on the cord you use can present a
reasonably bulky profile on your rack. Also the knot forming the loop can
sometimes get in the road.
The cordelette is just a large sling, 6 or so metres
in length. To create one on the cheap it can be made from 7mm or thicker
accessory cord (perlon) tied in a loop with a triple fisherman's knot (as for double fishermans, but
with an extra stopper knot on each side). A
little dearer you could also use, for example, 5.5mm Blue Water Titan
(spectra) cord. The disadvantage with cord is that it can become twisted (pig
tailing), fairly easily and depending on the cord you use can present a
reasonably bulky profile on your rack. Also the knot forming the loop can
sometimes get in the road.
To alleviate these concerns, my preference is to purchase a pre-sewn cordelette made from super strong tape or webbing, just like a large (6m or so) sewn sling. These come in two versions, the normal sewn loop or my personal favourite the "snake", which rather than being sewn in a loop is left as a single length but with "eyes" (pictured right) sewn on each end. The "snake" provides that extra distance over the loop, giving you more bang for the buck - important when your anchors are not so close together. The snake also means you have less strands to deal with.
Above Left: Some examples of the "Snake" concept are the one from "Vertical" a Western Australia manufacturer (See: Rock Hardware), pictured above right, and the "Mountain Tools Webolette ®" (Image curtesy of Mountain Tools ®, See: Their Webo-what? page), and "Metolius Equalizer Super Sling" pictured above left.
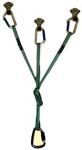
Equalising Anchors With A Cordelette ![]()
One important feature of the cordelette is it's ability
to speed up equalising anchors for a belay station. Rather than stuffing
around with slings of varying lengths and tied off portions of the
climbing rope, you simply follow these steps:
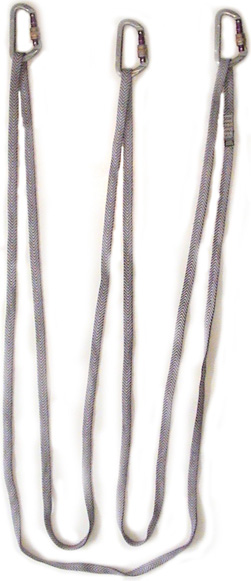
Step 1: Loop the cordelette through each anchor in the fashion
shown above. Step 2: Grab the loops at the bottom and pull them all
tightly together letting the strands slip through your fingers so that
they come together at one central point. Locate this point, suitable for
the belay, at the appropriate place in three dimensional space such that
it will be lined up with the direction of the load.
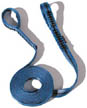
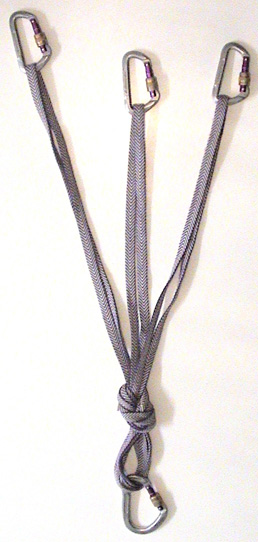
Steps 3 to 5: Form a figure eight
on a bight, or the over-hand knot shown above, and clip to the load.
The overhand uses slightly less material, handy if you're running short,
however the figure eight should be slightly easier to untie after it's
weighted.
As well as fast equalisation, another major benefit of using a cordelette, knotted as shown, is that it effectively ties off each anchor, offering very little extension if one of the anchors fails. Obviously the system relies on the direction of the load being known beforehand. You will need to untie & retie the knot to shift the belay to a new position. However, you're only moving one knot, instead of a whole mess of slings. Much simpler! If it's not safe to untie the central knot, you can take up slack on any given arm of the cordelette by temporarily unclipping that arm from it's anchor and adding a figure eight or over hand knot, just as you would have done to shorten a sling.
Note this article does not discuss how to create a suitable belay station. The pictures above are obviously vastly simplified for the purpose of illustration. Often you might need a fourth anchor, independant of the cordelette, to hold an upwards pull, for example. Or you might need to extend one arm of the cordelette to avoid using trad placements all in the same rock feature. Note, also that the angle between anchor points should not be greater than about 90 degrees or the whole point of equalisation will work against you rather than for you. (See: Equalising Anchors).
One way to rack your cordelette is to fold it in
half, then half again, and half once more, or until it's down to a manageable
size, then twist it up, as in the steps below:
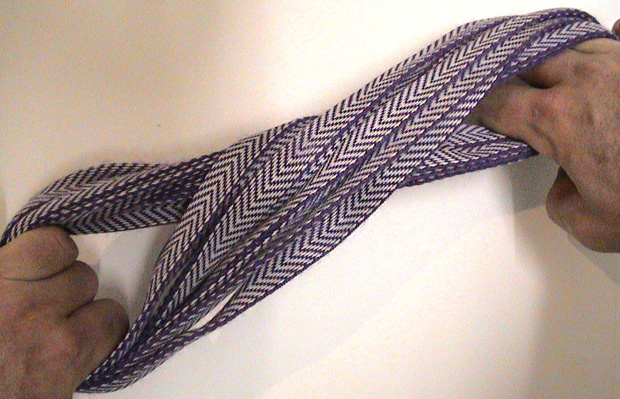
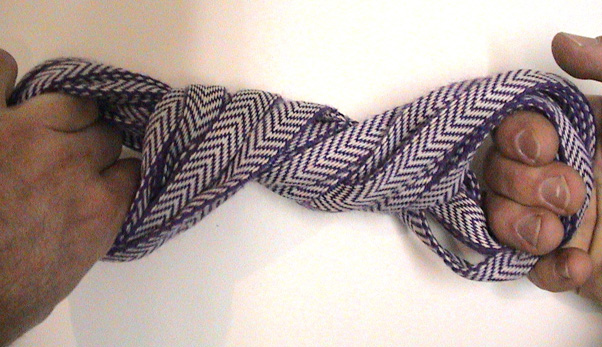

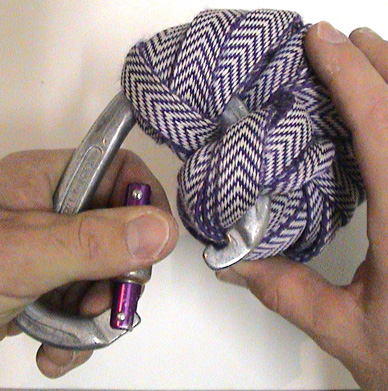
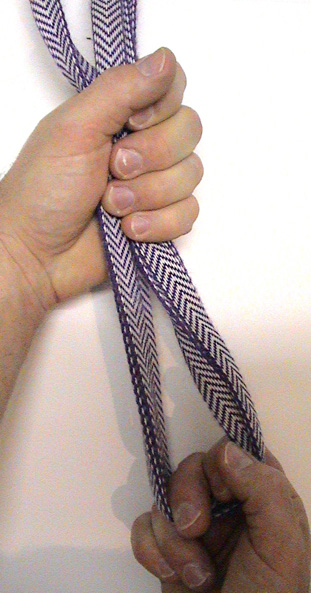
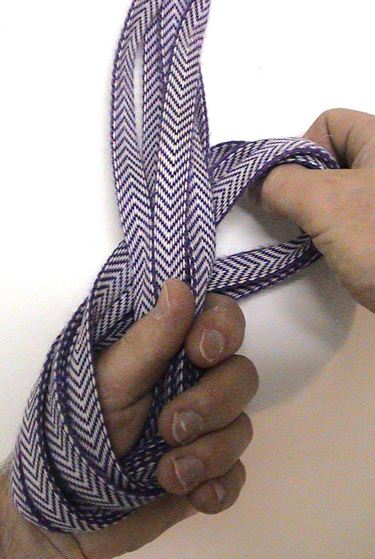
Step 1: Fold in half, again and again until it's small enough.
Don't let go of the tails. Steps 2 & 3: Twist the remaining
material a few times until it presents as small a profile as possible. Steps 4
& 5: Clip to a large carabiner and it's ready to go on your rack.
Further Reading:![]()
Cordelette
101 - How to set a belay using a cordelette from Gunks.com web site.
Equalize belay anchors with the cordelette - Illustration from
climbing magazine.
Choosing
material for your cordelette - From mountaineers.org web site.
What
should I use to make a cordelette - From dawn's Trad Girl web site.
Mountain Tools
Webolette ® - Described on Dawn's Trad Girl web site and a review
over on gearreview.com, or surf straight to the Mountain Tools page.
Webolette - How to
tie, racking, etc from Karl Lews web site.
Cordelette?
- Appropriate thickness of cord to use from GearReview.com web site.
Home
| Guide | Gallery | Tech Tips | Articles | Reviews | Dictionary | Forum | Links | About | Search
Chockstone Photography | Landscape Photography Australia | Australian Landscape Photography
Please read the full disclaimer before using any information contained on these pages.
All text, images and video on this site are copyright. Unauthorised use is strictly prohibited.
No claim is made about the suitability of the information on this site, for any purpose, either stated or implied. By reading the information on this site, you accept full responsibility for it's use, and any consequences of that use.