![]()
Sponsored By
ROCK
HARDWARE
| The Gorge, Mt Buffalo [ Back | Images | Forum ] |
|
||||||||||||||||||||||||
 The
most famous climbing destination of Mt Buffalo, and probably in the top 3
Victorian climbing destinations. Rather simple to find, just follow all
the road signs and tourists. To walk down into the Gorge, follow the South
Side track, which can be found by starting down the Underground River
track, then branching off L after 30m on the signposted Mushroom Rock
trail. Follow this down for 5min to the obvious and rather extraordinary
Mushroom Rock. From here the trail is a little fainter so keep your eyes
open. Continue down from Mushroom Rock for another 80m or so, trending R.
Here some cairns should appear close to the drop on your left. At the
cairns, the track heads back L (facing downhill), and from here on
continues to traverse L and down for perhaps 500m past regular cairns, all
the way into a massive gully, 200m directly below Bent's Lookout (about
50m L of Angel's Buttress). The track then follows this gully down, past
the base of Angels and onwards.
The
most famous climbing destination of Mt Buffalo, and probably in the top 3
Victorian climbing destinations. Rather simple to find, just follow all
the road signs and tourists. To walk down into the Gorge, follow the South
Side track, which can be found by starting down the Underground River
track, then branching off L after 30m on the signposted Mushroom Rock
trail. Follow this down for 5min to the obvious and rather extraordinary
Mushroom Rock. From here the trail is a little fainter so keep your eyes
open. Continue down from Mushroom Rock for another 80m or so, trending R.
Here some cairns should appear close to the drop on your left. At the
cairns, the track heads back L (facing downhill), and from here on
continues to traverse L and down for perhaps 500m past regular cairns, all
the way into a massive gully, 200m directly below Bent's Lookout (about
50m L of Angel's Buttress). The track then follows this gully down, past
the base of Angels and onwards.
Above Right: The view from the drive up, near Eurobin slabs. From right to left is Queen Victoria Buttress (facing camera); the mighty North Wall (facing left); the waterfall; and the South side of the Gorge. Angels Buttress is the first major section of rock left of the waterfall, below the orange patch of rock.
The North Wall ![]()
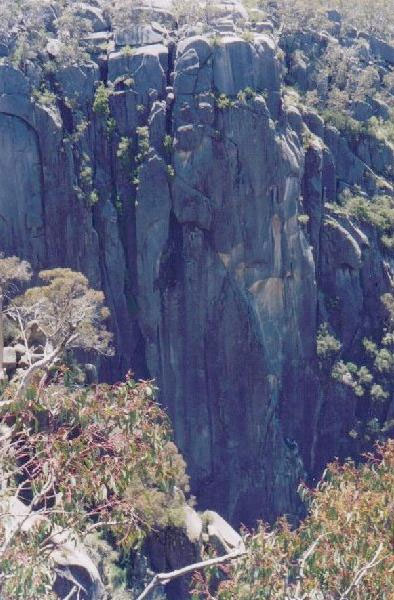
Above Left: The legendary aid route Ozymandias heads up the highest
part of this wall. Some flyspeck climbers can be seen on Big Grassy near
the bottom of the photo - thats the first bivouac! Angels Buttress is in
the sun, visible through the trees at the bottom of the pic. Above
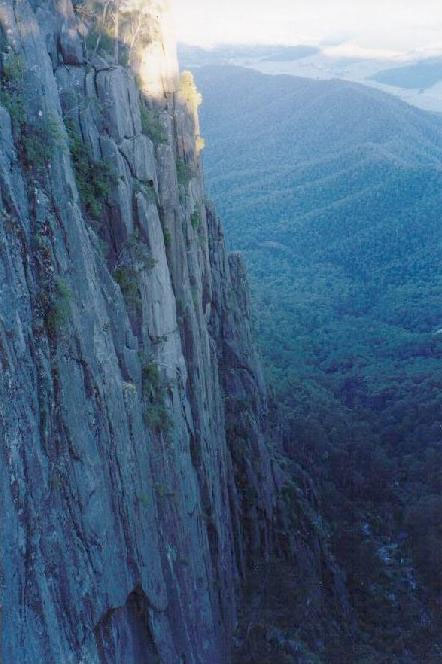
Right: Another view of the North Wall, from Pulpit Rock. Pretty steep
huh!
The South Side ![]()
Right:
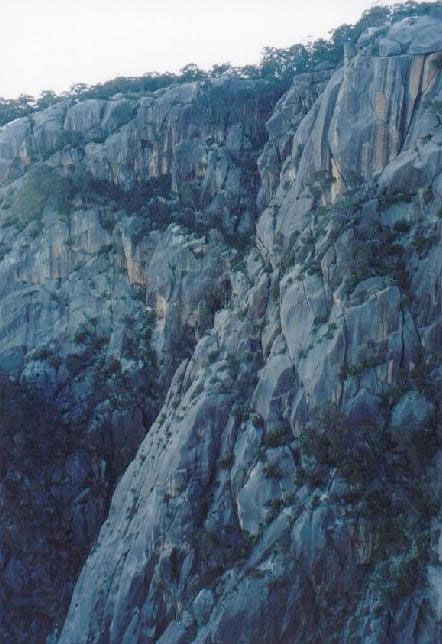 Angels
Buttress is the obvious major feature from bottom left to top right.
Guidebook aficionados will immediately recognise the black and orange
streaked wall at top right - see the front cover! And the hang glider ramp
is at top left - Fat Wall uses this for it's anchor. Isotope Wall is the
large section of rock down below the far rim.
Angels
Buttress is the obvious major feature from bottom left to top right.
Guidebook aficionados will immediately recognise the black and orange
streaked wall at top right - see the front cover! And the hang glider ramp
is at top left - Fat Wall uses this for it's anchor. Isotope Wall is the
large section of rock down below the far rim.
South Side Rim
** Fat Wall Ordinaire Banana Blase 22m 16
A fine route, though it ain’t 30m like the guide says, nor am I
totally convinced about 2 stars. Maybe it’s better if you lead it, or
maybe it’s the atmosphere. Anyway, rap off the hang-glider ramp (not down
the gully trashing the vegetation!), and stay R of the bushes (facing out)
as you rap in - the line will become obvious. Anchor on the wide ledge off
a BB and the first gear placement. Crux laybacking for 8m (tricky gear
placements) leads to easier territory - lots of jugs, with the odd
insecure move. Avoid the wide crack just R.
Isotope Wall ![]()
A 100m high slabby area, positioned 50-150m down below the hang-glider ramp. Access by walking down the South Side track. About 100m down and L from Mushroom Rock, the Devilled Cream Buttress is the first significant chunk of rock to appear. Commander Cody (** 21) is an obvious attractive flake going up the 50m face on the downhill side of the Devilled Cream Buttress, and makes a good landmark. Leave the South Side track here, and generally traverse across the hillside for 150m, staying about 50m below the major cliffs above. Isotope Wall is the biggest section of rock up above you, once below the middle of it head straight uphill to meet the cliff. You should arrive where some broad L-angling dyke systems meet the ground. This is where High Time (looks great) and Diamond Dogs (looks silly!) both start. Rack up here for the following 2 routes, then scramble 30m up L over boulders to the elevated ledge.
* Wild Blue Yonder 105m 17
A good warm up with convenient rap tree at 45m. Unless P3 is 60m long, the
guidebook has the length badly wrong! It'd also probably be better to
combine the 1st two pitches. From far L end of elevated ledge, scramble up
onto smaller ledge/ramp, and walk R to big tree with fixed cord. Belay
here. 1) (* 25m 17) Move R up pleasant easy ramp/crack past bush to a
tricky move to gain flake. Funky steep moves L up flake/dyke to BB. Mantle
over bulge onto dyke, then pad up slab to horizontal breaks. Move back R
6m to small belay stance. 2) (20m 10) Step R then doddle up easy slabby
stuff trending L, with the odd move over bulges. Belay at big tree. 3)
didn't do - looked ordinary so we rapped off instead.
* Goat Island 45m 19
Excellent steep face climbing up a funky dyke system, offering well
protected moves between good positive holds - a nice change from
smearing!! Not 21 though! Start at R end of elevated ledge. Reachy moves
up slightly hollow flakes (take a small sling for the first, and small
cams for the second), to 1st BB. More easily past med. cam to 2nd BB, then
lovely crux moves L and up over bulge to jugs. Sling a bollard out L, then
follow easy slabby dyke system up and L for 25m past occasional small
wires/RPs. A damn good climb.
Pretty obvious, access from the hang-gliders carpark near the Chalet. Walk down the South Side track, it's about 30mins from the top. Rack up at the top cause you don't want to leave packs down there! We did it in 4hrs so didn't need food or drink, but if you expect to take a bit longer I'd recommend carrying water and energy food because it's fairly energetic. You really shouldn't get on it without tape gloves (but who am I to talk), and definitely don't get on it with slippers!
*** Where Angels Fear to Tread 263m 17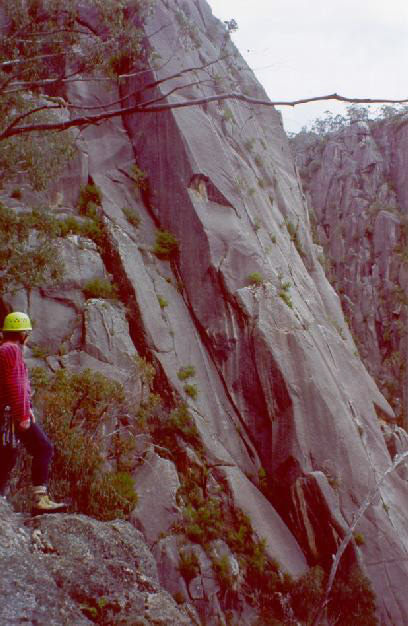
An awesome line, the cracks just go on and on all the way. Amazingly, just
as one crack fizzles out, another conveniently appears to the L or R, with
the two connected by delicate slab moves! Incredible feature. The big
downer is how painful the footjams get after 20m, let alone after 220m!
It's really L foot intensive the whole way too - your R foot is always
smearing and only gets in the crack about 5 times. So be sure to take big
beefy tapegloves and a full-on heavy-duty ankle-length left boot. I did it
without tape gloves and with a normal climbing shoe, and it was PBF
painful in the end! We started at 3pm and were up it in 4 hours, but for
many parties it would probably be wise to allow at least double that. The
pitch lengths are for how we did it, but for the first 140m there's
basically no stances so belay wherever. In particular, combine P4&5 as
described if you have a few duplicate big cams.
Key: % = "toe trashing, bone grinding, ankle mushing footjams" !!
1) (*** 35m 16) Classic splitter fist crack in very rough granite, with much %. 2) (** 30m 16) Lovely laybacks up slabby handcrack, then another 20m of fist/offwidth % to small stance (chopped bolts). 3) (*** 45m 16) Easily up wide crack for 8m then smear 8m L up slab to next crack. Up offwidth % for 30m (!!) to SHB below bulge. 4) (** 10m 17) Hard through bulge % then semi-hanging belay - if you're out of gear (like I was)! 5) (*** 25m 17) Lovely delicate step 3m R to hand/fist crack, up it for 20m % to a 5m thin fingers section (crux), to the first ledge on the route (!!). Belay here below short chimney. 6) (* 25m 15) Up short chimney (can be avoided around to the R) then up the L fingercrack, chimneying off the block on the L. Step off top of L block to offwidth % and belay on tree below offwidth (big hexes). 7) (* 18m 16) Hard offwidth for 5m %, then stem off the R hand crack up to ledge. 8) (35m 16) Ignore steep crack above, move down R for 10m (possibly shift belay). Up low angled corner for 20m, quite tricky stemming/smearing. Trend L at bushes to ledges below steep crack. 9) (50m 16) Ignore steep crack, step L to featured crack which is much easier (but still requiring a little %). Up this to big ledge, move back and R to steep corner. Avoid steep offwidth (with %) by briefly stepping R to small dyke on arete. Tricky corner (wet and dirty, with some % for a change), leads to jumbled boulders on ledge, near a large tree. Unrope, then walk back and down L into Burston's Crevasse, and walk up it for 150m to the rim.
A view of this magnificent buttress from the South Side Track walk-in. Jerry Maddox is the poor soul shown who I've conned into leading me up the hard bits!!! :-)
Further Reading:
Mt
Buffalo, A Rockclimbers Guide - A climbing guide book, edited by
Jeremy Boreham and David Breeton and available from local
climbing shops, or the VCC.
Wills
Climbing Page - Details on this area.
Home
| Guide | Gallery |
Tech Tips | Articles |
Reviews | Dictionary |
Forum | Links |
About | Search
Please read the full disclaimer before using any information contained on these pages.
All text, images and video on this site are copyright. Unauthorised use is strictly prohibited.