![]()
Sponsored By
ROCK
HARDWARE
| Grahams' Creek, Victoria
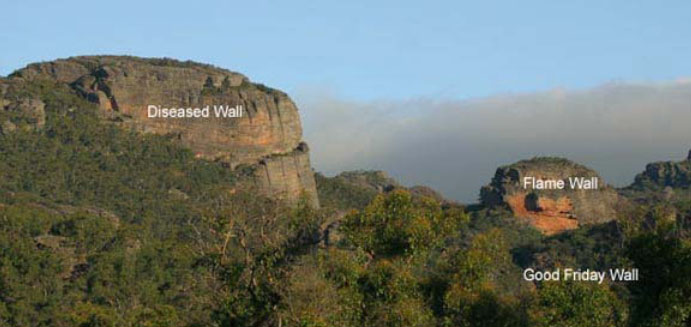
Range, Grampians [ Grampians Overview | PDF | Map | Images | Forum ] [ Good Friday Wall | Grahams Creek Gorge | Flame Wall | Diseased Wall ] |
|
||||||||||||||||||||||||
![]() [
This guide contributed by Neil Monteith. Disclaimer: Rock climbing is a
dangerous sport. None of the information contained in this document has
been verified. Treat all fixed gear with suspicion, route grades may be
incorrect and the rock may be poor. The editors of this document take no
responsibility for any injury arising from the use of this information. If
there are mistakes in this guide then let the editor know by emailing
nmoneith@yahoo.com. ]
[
This guide contributed by Neil Monteith. Disclaimer: Rock climbing is a
dangerous sport. None of the information contained in this document has
been verified. Treat all fixed gear with suspicion, route grades may be
incorrect and the rock may be poor. The editors of this document take no
responsibility for any injury arising from the use of this information. If
there are mistakes in this guide then let the editor know by emailing
nmoneith@yahoo.com. ]
 Region:
VIC : The Grampians : Victoria Ranges
Region:
VIC : The Grampians : Victoria Ranges
Description: A very remote area which has been the centre of some renewed interest. The spectacular Flame Wall has some excellent steep sport routes on gorgeous orange rock.
Location: 700m North of Grahams Creek crossing on Harrop track a cairn marks the walking track. Good Friday Walls is the orange north facing crags visible above the tree tops from the road. Diseased Wall is the south facing large grey wall to the left (north) of Good Friday Gully. Flame wall is the bright orange block on the right (south) of Diseased Wall beyond Good Friday Walls. Follow the marked track for about 5 minutes to an old vehicle track and cairn. Turn right, walk about 20m then left again to continue across the hill to cross creek. The track continues up then across rocky slope, following cairns to Good Friday Walls. Walk west along base of this wall and up over the hill until you see Flame Wall in the distance. Follow cairned rock shelf south and down into the creek and up the other side to eventually arrive at Flame Wall.
Walking times (deduct 15min if you’re Neil) Harrob tk to
Good Friday Walls 25-30
min Harrop tk to Graham's Creek Gorge 35 min. Harrop tk to Flame Wall
50-60
min Harrop tk to Diseased Wall 60 min
A worthwhile excursion when returning from Flame Wall is to follow down the creek bed and into the gorge proper and then back up to Good Friday Wall. If the creek is flowing strongly the slippery ramp below Rock Lobster can be avoided by a keyhole on the right leading into an amazing bouldering cave.
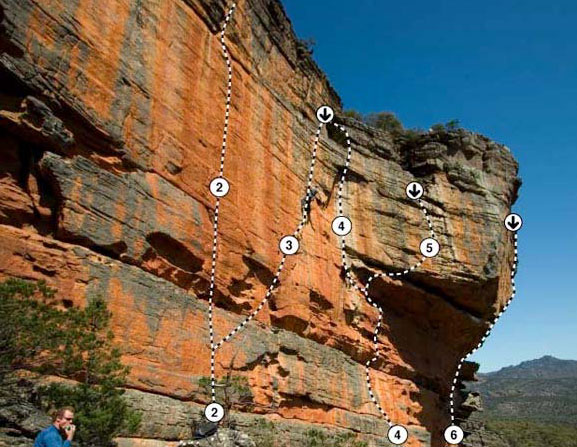
Crag: VIC : The Grampians : Victoria Ranges : Graham's Creek Area
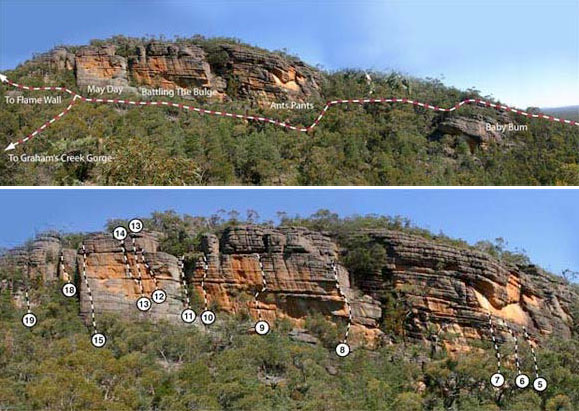
Description: A pleasant north facing series of walls reminiscent of Gilhams Crags. Most of the routes are vertical and require wigglies. A few bolts exist on some of the harder faces but this is the exception. The wall blazes in the sun all day long. Avoid in summer. Location: A cruisy 30min walk will get you to the crags. All routes are described right to left when facing the cliff.
Rock angle: Vertical
Orientation: N
Walk in time: 15-30 mins
Approach: Steep
Kid friendly: Yes
Routes:
The first climbing is hidden away below the walking track. A cairn marks the descent of about 30m to the Baby Buttress about 50m before Ants Pants. The climbs here may provide light entertainment.
1: Lachlans Big Day
Out 10m 19 [Trad]
Boulder up to horizontal. Step R into the finger crack and up. Descent:
Walk-off. Toprope: Yes
Michael O'Reilly, Steve Chapman & Robin Holmes 10-2004
2: Where’s Mum? 10m
22 [Mixed]
Start as for LBDO. At 2m traverse left to RB. Crank up right to jugs and
wire. Easier climbing to top. Descent: Walk-off. Toprope: Yes
Steve Chapman & Kaz Anwin 03-2005
3: The Crib 10m 22 [Mixed]
Starts 4m L of Where's Mum? at RB. Bouldery start just R of bolt. Right to
Where's Mum?'s bolt, back left on jugs to crib. Have a lie down and cry,
then up easily. Descent: Walk-off. Toprope: Yes
Steve Chapman 10-04-2005
4: Baby Bum 12m 18 [Trad]
Starts 8m L of The Crib. Up horizontal bulges to seam. Up
this to top. Descent: Walk-off Toprope: Yes
Robin Holmes, Steve Chapman & Michael O'Reilly 10-2004
The main wall you reach after the Baby Buttress gully has a large termite nest on the ground. Several brooding steep cracklines break through what is mosty smooth and blank. Descent anchors have not been placed yet. Currently descent is via a dodgy roped boulder up and right to gully.
5: Ants Pants 15m 25* [Trad]
Start 5m R of Elle McFerret at termite nest. Bouldery
start past fixed wire to crack. Crack to finish. Note: Start can be aided to give
sustained crack climbing at about 24. Descent: Walk-off. Toprope: No
Michael O'Reilly, Robin Holmes & Steve Chapman 10-2004
6: Elle McFerret 18m
24** [Trad]
Great climbing on excellent rock. Starts 3m right of blunt
arête. Boulder start to gain crack (protected with a good, shallow wire at full
stretch). Bomber gear and sustained climbing to below roof. Committing pull past
bulge via crimps in the black streak to good #2 camalot placement. Descent: Walk-off. Toprope: No
Steve Chapman, Michael O’Reilly & Robin Holmes 10-2004
7: Celebrity Rooter
20m 22* [Trad]
A fine route marred slightly by a fragile exit. Starts 2m
left of blunt arête at left end of first wall. Follow twin cracks to good holds and gear at
steepening. Committing climbing to ledge. Step right to belay and rap anchors.
Initial escape was off right past dodgy tree and above. Alternatively up big chimney.
Descent: Walk-off. Toprope: No
Steve Chapman & Robin Holmes 09-2004
Walk around left from Celebrity Rooter and scramble up
onto shelf below impressive north facing orange wall reminicant of Arapiles. On the
far right side is a bulging arete with a crackline start, this is The Lying Rodent. To
descend off most routes you need to scramble off this detached pinnicale and walk to
the far left end and down via May Day's descent gully.
8: The Lying Rodent
22m 19* [Trad]
Starts at the short splitter finger crack on the small
wall just right of the major orange wall. Climb the crack with difficulty to the ledge. Climb over
the bulging buttress and the short corner above to the ledge. Organise protection and
then traverse left one metre to the arête. This is the right arête of the major orange
wall. Climb the arête in a fabulous position to the next ledge. Finish up the crack
above, or the arête on the left. Belay on the large ledge. Scramble up to the top and
down climb the pinnacle at the back. Descent: Walk-off. Toprope: No
Michael O’Reilly & Ross Timms 2004
9: Battling The
Bulge 17m 26**
[Mixed]
Slick and sustained Arapiles style line. The central line of the middle buttress. Leap for jug from rock cairn (FH), then up short face to
fingercrack. Up this for 6m to slight stance. Swing right across awkward bulging face
(FH) to below final seam. Up this which eases to jugs and lower-off anchor. Bring a
full rack and some slings to extend runners in the traverse, Descent: Lower-off. Toprope: No
Neil Monteith 01-10-2005
10: Ralph's Journey
16m 24* [Mixed]
Sustained with sinker wires. Start behind clump of callitris 5m right of cleft
seperating right and left walls. Bouldery start past FH to gain crack proper. Up on good
finger locks to horizontal break.Traverse right 3m then up over bulges. Descent: Walk-off. Toprope: Yes
Steve Chapman, Rob Booth, Adam Demmert & Jackie Bernardi
04-2005
11: Fatty and Baldys
Big Adventure 16m 15 [Trad]
Starts 3m left of Ralph's Journey on right side of cleft
separating right and left walls. Climb the right side of the cleft to the top. Descent: Walk-off. Toprope: Yes
Rob Booth & Steve Chapman 04-2005
The next routes are on the 'main wall', which is just left of the Ralph's Journey. It has a slabby juggy grey start and 15m of nice orange rock to finish. You can easily descend via the left side (east) side and down a short squeezey gully.
12: Fried Day
(project) 20m 23 [Mixed]
Top roped only. Rob has drilled the holes, but no bolts as
yet as he ran out of daylight. Starts 4 meters right of Burnt Out behind the
detached small pillar. A few big moves on sketchy feet to nice climbing on the leftward
leaning upside-down staircase. Descent: Walk-off. Toprope: Yes
Rob Booth & Steve Chapman 04-2005
13: Burnt Out 17m 23** [Mixed]
Best route at the crag. Start as for May Day. At May Day's traverse left continue
straight up corner and start of head wall past three BR's to break, #3 camalot, then
continue past one more BR (hard clip) to run it out to the top (possible wires). Descent: Walk-off. Toprope: Yes
Adam Demmert & Alastair Hudson 23-04-2005
14: May Day 25m 18 [Trad]
Climbs the left leaning dog-legged crack that goes up the
middle of the orange wall (left of the major orange wall). Scramble up the easy slab
to the belay ledge just below the major crack. Climb the corner/crack to the
horizontal break. Traverse left one metre and then climb the crack above to a tricky
mantle onto a dirty ledge. Climb the deep crack/chimney above to the top. Descent: Walk-off. Toprope: Yes
Peter Darby & Graham Saunders 09-1980
The next routes start back on ground level.
15: Kazual 40m 16 [Trad]
An atmospheric adventure up the left side of the main wall
with a fair bit of loose rock in the upper half. Start behind the conifer 5m R of Napalm
Sunday. Up the grey slab then follow easy ramp L to steep orange cracks and through
small roof. Excellent view. Descent: Walk-off. Toprope: Yes
Steve Chapman & Kaz Anwin 03-2005
16: Napalm Sunday
20m 14 [Trad]
Climb the crack left of the left arete. Descent: Walk-off. Toprope: Yes
Neil Barr & Craig Nottle 04-04-1980
17: Flying Possum
20m 21 [Trad, serious]
Start 3m L of Napalm Sunday. Up crack then step L at
second horizontal then up loose shallow corner. Descent: Walk-off. Toprope: Yes
Robin Holmes & Steve Chapman 10-2004
18: Poets Corner 14m
19 [Trad]
10m up and left of Flying Possum. Start on ledge under the beautiful but too short orange
corner. Left under roof and on up to the top. Descent: Walk-off. Toprope: Yes
Rob Booth & Steve Chapman 03-2005
About 10m left of Flying Possum and below Poets Corner is an 8m vertical wall (Gay Welders Wall) with a few very short routes.
19: Gay Welders Have
Hotter Rods 8m 21 [Trad]
Starts 15m L of Flying Possum. Nice short face climb. #3
wire in sideways protects crux. Go up. Descent: Walk-off. Toprope: Yes
Steve Chapman, Ross Timms, Tuesday Phelan 04-2005
20: Alex Flashdance
8m 23 [Trad]
Starts 3m L of GWHHR. Up over bulge to a long reach from
undercling. Alternatively pike left into easy going at 5m or why not just walk
around the back. Descent: Walk-off. Toprope: Yes
Steve Chapman & Ross Timms 04-2005
21: Filthy Girls 8m
15 [Trad]
Crack? Descent: Walk-off. Toprope: Yes
Tuesday Phelan & Anne Redfern 04-2005
Crag: VIC : The Grampians : Victoria Ranges : Graham's Creek Area
Description: A few nice wall routes in an attractive water side setting (in winter).
Location: Down below Good Friday Walls is Graham's Creek. Upstream by about 50m from Napalm Sunday is this beautiful little gorge, with cliffs rearing up on both sides. The southern side has the climbing.The best access is by scrambling down the very steep slope below Napalm Sunday following rock cairns. It is about a 2 minute walk from Good Friday Walls.
Rock angle: Vertical
Orientation: N
Walk in time: 30-60 mins
Approach: Rugged
Kid friendly: Yes
Routes:
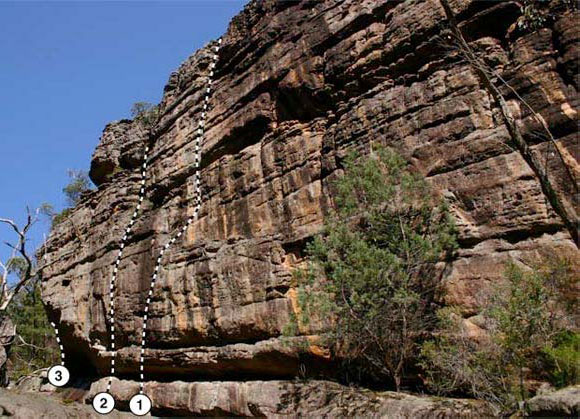
1: Back in Black 20m
20* [Mixed]
Start 5m R of Wonga Park RFB. Black crack then R to ledge.
Clip BR then climb bulges on R to break. Crack to top. Descent: Walk-off. Toprope: Yes
Robin Holmes & Steven Wilson 02-04-2005
2: Wonga Park R.F.B.
20m 16 [Trad]
The line 20m right of Rock Lobster, just beyond the
overhangs. Mantleshelf to get started. Descent: Walk-off. Toprope: Yes
Ian Barr, Neil Barr, Peter Darby & Grahams Sanders 09-1980
3: Rock Lobster 28m 19* [Trad]
An appealing finger crack. Located on the far left end of the wall (20m left of Wonga
Park). It can be difficult to reach when the water is up. Descent: Walk-off. Toprope: Yes
Craig Nottle, Peter Cunningham & Neil Barr 04-04-1980
Pitch 1 (18m, 19) : Climb the overhanging finger crack and traverse left to a ledge. Pitch 2 (10m, 14) : Easily up corner.
Crag: VIC : The Grampians : Victoria Ranges : Graham's Creek Area
Description: An outstanding orange prow of jutting sandstone that requires a long and taxing approach. Unfortunately the centre of this formation is either too steep or too blank for mere mortals. Perhaps the next generation will take advantage of some of the incredible potential of this area. In the meantime you can enjoy some very nice face and roof routes on either side of the main prow. Climbers have been sniffing around up here for decades. In early 2003 Neil Monteith and James Pfrunder hiked up in the pouring rain and brought back photos of the main wall dubbing it the Graham’s Creek Supercrag. They were however put off by the long approach walk, and the apparent blankness of much of the face. The sheer size and angle was enough to impress others who soon made their move. In 2005, the Yerba crew cut a path up the creek from the nearby Good Friday Wall and set about bolting the unlikely roof climb Out Of Control (24).
Robin Holmes dragged several assistants in to help in his two day marathon bolting effort. Eventually he returned for the redpoint and brought in Neil Monteith and Will Monks. Neil got excited and worked furiously to bolt the steepest thing that looked possible, with Flaming Lips (26) being the end result. Steve Chapman optimistically bolted a very thin face route that was steeper than he thought upon redpoint attempts! This route might have to wait for a super hard man. In the meantime Will Monks got given a nice partially bolted project on a platter by the Yerba crew. This route had to wait for more than six months before it was finally climbed as Slow Burn (23). Earlier in the year Steve Chapman also tradded his way up a thin crack variant to Out Of Control to produce Edge Burner (23). In late 2005 Malcolm Matheson did his usual and onsighted all established routes in a single day, including a drawn out battle with the pumpy Flaming Lips.
 Location: All up the approach takes about an hour from the
road. If you are as enthusiastic as Neil you might get this down to 40 minutes. Walk into
Good Friday Wall. From the far left (uphill) end of this crag keep following rock
cairns and tape markers up over the hill (just south of the gorge) to arrive on rocky
plateau with clear view east towards the proud Flame Wall. Walk right (south)
along these rock shelves following large cairns and tape to eventually drop down
into the small creek (runs for 8 months of the year). Cross this, and hike steeply up
the other side to arrive at the base of the wall. For all the routes you scramble
onto a friendly ledge, from the left side, that offers good sun-napping locations for belayers. The wall faces into the sun for most of the day with shade
only in the early hours of the morning. Flaming Lips is in shade until midday.
Rain protection is minimal if you get caught this far out without an escape plan!
Location: All up the approach takes about an hour from the
road. If you are as enthusiastic as Neil you might get this down to 40 minutes. Walk into
Good Friday Wall. From the far left (uphill) end of this crag keep following rock
cairns and tape markers up over the hill (just south of the gorge) to arrive on rocky
plateau with clear view east towards the proud Flame Wall. Walk right (south)
along these rock shelves following large cairns and tape to eventually drop down
into the small creek (runs for 8 months of the year). Cross this, and hike steeply up
the other side to arrive at the base of the wall. For all the routes you scramble
onto a friendly ledge, from the left side, that offers good sun-napping locations for belayers. The wall faces into the sun for most of the day with shade
only in the early hours of the morning. Flaming Lips is in shade until midday.
Rain protection is minimal if you get caught this far out without an escape plan!
Rock angle: Steep
Orientation: W
Walk in time: 30-60 mins
Approach: Rugged
Kid friendly: No
Routes:
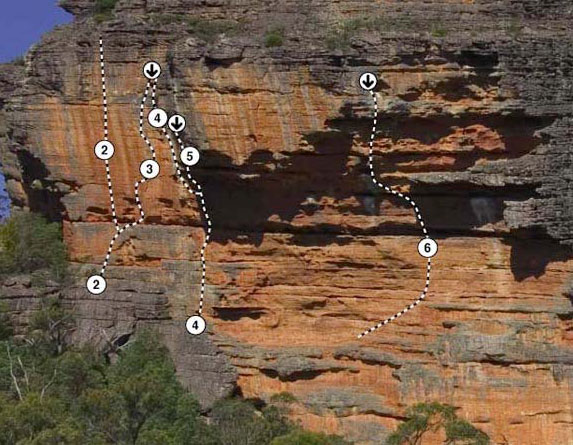
1: Starsky and
Thrutch 10m 16 [Trad]
Wide bulging crack on lower cliff, 10m left of access
gully to the left side of Flame Wall. Descent: Walk-off. Toprope: Yes
Anita Sharma & Robin Holmes 20-02-2005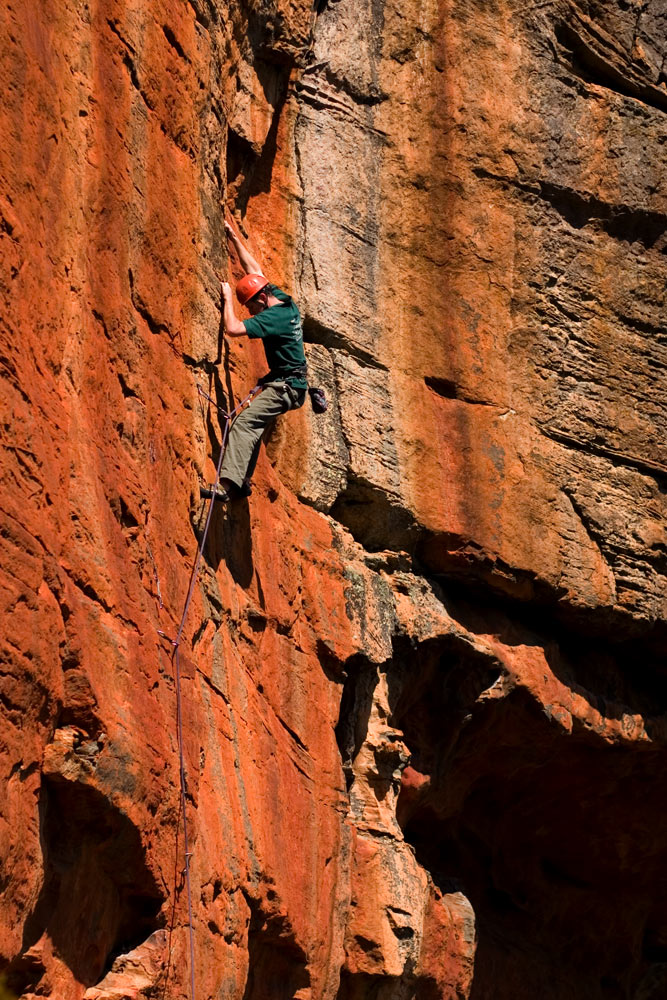
2: The Thin Red Line
(project) 20m 29**
[Mixed]
Excellent orange face with lots of tiny crimpers and
several FH's. Walk right to rap anchor above Slow Burn. Descent: Rap-anchor. Toprope: No. Equipped by Steve Chapman 2005
3: Slow Burn 18m 23** [Mixed]
A sustained face, neglected for several months after
bolting. The 4m direct start to the ledge has been done but awaits
a bolt. In the meantime, start 4m further left beneath the bolted project up the
impressive red face, where a good wire protects the moves to the ledge. Move 4m R on ledge, then climb the face 3m L of the thin
crack (Edge Burner), past 3FH, med-large wires and a #1.75Fr. The high DRB anchor
can be accessed from above. Descent: Lower-off. Toprope: No
Will Monks, Malcolm Matheson, Gareth Llewellin, Neil
Monteith 18-09-2005
4: Edge Burner 20m
23** [Mixed]
Excellent climbing, bomber protection. Up Out of Control to 4th FH. Ooze 3m left to horn.
Directly up lovely crack and over roof on trad gear. Continue up to Double RB lower off on
high ledge. First ascent was a ground up onsight. Descent: Lower-off. Toprope: No
Steve Chapman & Robin Holmes 05-03-2005
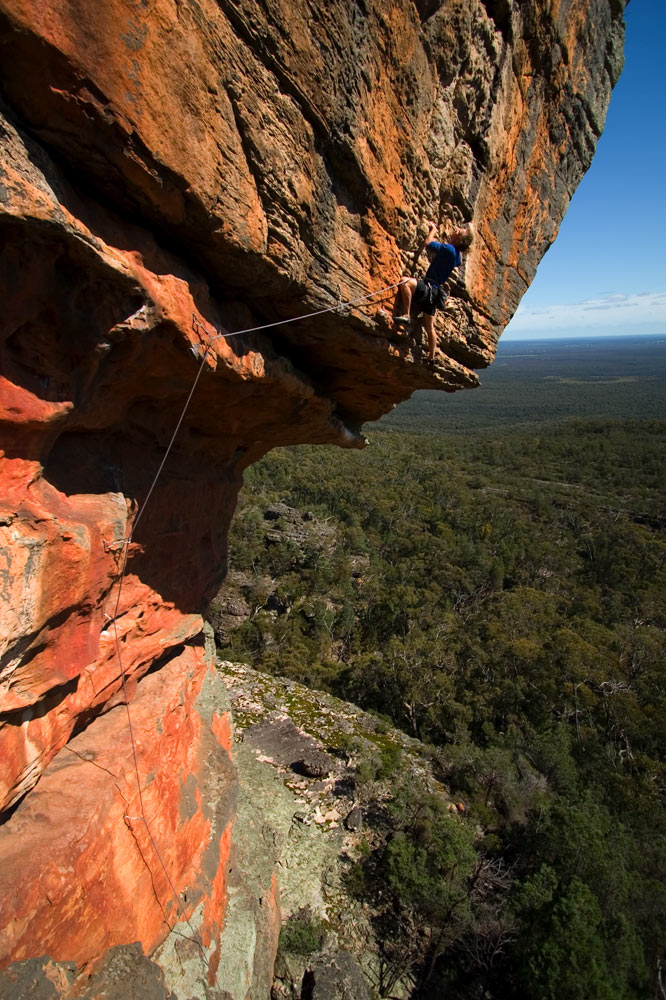
Impressive roof climb in a truly spectacular setting. Start from back of block (FH) at end of pinnacle. Up corner to ledge. Step R then up bulges to rest. Step up
to FH then monkey R on unexpected buckets. Turn the roof at scoop. Swing R to
finish up white water wash then slightly L to RB lower off (note: near 50m lower off
to top of pinnacle - tie rope end to belay FH). Descent: Lower-off. Toprope: No
Robin Holmes & Steve Chapman 20-02-2005
6: Flaming Lips 27m
26** [Sport]
Big time cave climbing up right side of the orange wave. Scramble in from the left side onto belay ledge 15m from
the ground. Belay off single FH. Head up and right easily for 8m to small ledge and UB.
Take a breath and start climbing up and out past eight bolts in incredible
positions to finish in small cave. Hard moves are at third and sixth bolts. Good foot jams,
knee bars and leg slots can be found for recovery all the way up. Use a 60m rope for
lower-off and tie a knot in the end! Descent: Lower-off. Toprope: No
Neil Monteith, Mike File & Kent Paterson 13-03-2005
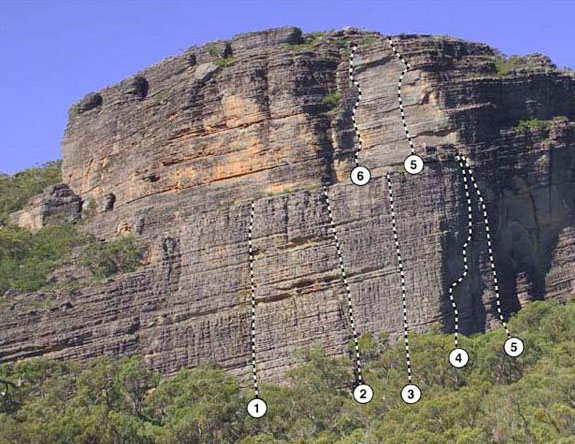
Crag: VIC : The Grampians : Victoria Ranges : Graham's Creek Area
Description: Home of the mega jug. One of the largest bits of rock in the Grampians, but totally lacking in any sort of inspiring climbing for the most part.
Location: 122693, 612869. From Flame Wall bush bash north towards the towering choss pile of Diseased Wall. It is an easy 5min thrash. To descend (epic) walk back and left (west) across rock until you can climb down a few metres, then walk left (west) towards treed gully looking for cairn at top of small wall. Scramble down short face and then down scrub gully to bottom.
Rock angle: Vertical
Orientation: SW
Walk in 30-60 mins time:
Approach: Rugged
Kid friendly: No
Routes:
1: Laryngitis 80m 7 [Trad]
Left the first ascentists speechless. The left hand line. Descent: Walk-off Toprope: No
Ian & Neil Barr 09-1980
Pitch 1 (40m, 7) : Climb mossy rock to ledge.
Pitch 2 (40m, 7) : The gutter above is clean and has the
biggest jugs that you will ever see.
2: Bronchitis 90m 7 [Trad]
The better of the easy routes. Climb the right hand line with a choice of belay spots. Descent: Walk-off. Toprope: No
Peter Darby & Graham Sanders 09-1980
3: Jugular Vein 80m
11 [Trad]
The large juggy wall between Spinal Column and Bronchitis.
Follow your nose, keeping a bit right of centre. Walk off at half-way
terrace. Descent: Walk-off. Toprope: No
Keith Lockwood, Louise Shepherd (alts), Steve Monks
24-10-1989
4: Spinal Column
100m 20* [Trad]
The major corner line through the centre of the wall
offers a fine adventure. Mossy and loose. Has been led in two pitches. Descent: Walk-off. Toprope: No
Peter Darby, Neil Barr & Ian Barr
Pitch 1 (30m, 18) : Climb the corner to the first roof.
Pitch 2 (10m, 19) : Go right under the first roof and
belay just above. The footholds on this pitch are very mossy!
Pitch 3 (20m, 20) : Jam underneath the next roof (crux)
and up the corner to a brilliant belay beneath the third roof.
Pitch 4 (10m, 17) : Continue up and traverse under the
next roof.
Pitch 5 (30m, 10) : Climb the stegosaurus wall to the
Operating Theatre.
5: Accidental
Incision During Surgery (AIDS) 105m 21* [Mixed]
One of the longest routes in the Victoria Ranges. Descent: Walk-off. Toprope: No
Jono Schmidt (pitch 1,2,4 Rich Ham (pitch 3) 23-04-2005
Pitch 1 (40m, 12) : Starts 12m right of Spinal Column.
Wander up middle of wall on good jugs to small belay stance. Some loose
rock.
Pitch 2 (30m, 13) : Continue up face to belay ledge level
with Operating Theatre (this is the same belay point at the end of Spinal
Column). Walk 20m left behind block to Operating Theatre Ledge.
Pitch 3 (20m, 21) : Hard start up behind tree and good
moves up middle of face on slopers and small edges. Continue up to small
ledge.
Pitch 4 (15m, 19) : Head up overhanging wall to large
horizontal break then traverse right to arête and up. Harder direct finish
is possible but needs bolt.
6: Welders Butt
Crack 45m 12 [Trad]
Adds an obvious finish to any route on this lower wall.
Climbs wall above the Operating Theatre. Starts 25m left of the finish of Spinal
Column. Very juggy corner leads to ledge and optional belay. Keep plodding upwards
to finish up steep arête and summit glory. Walk off and descend tediously down
western side. Descent: Walk-off. Toprope: No
Gay Welders Union 23-04-2005
Home | Guide | Gallery | Tech Tips | Dictionary | Forum | Links | About | Search
Please read the full disclaimer before using any information contained on these pages.
All text, images and video on this site are copyright. Unauthorised use is strictly prohibited.