![]()
Sponsored By
ROCK
HARDWARE
| Mt Buller Ice Climbing [ Images | Forum | Trip Reports ] |
|
||||||||||||||||||||||||
By: Graeme Hoxley, Geoffrey Butcher.
Jan 2006 Note: This guide is now out of date and inaccurate. Please contact Geoffrey Butcher via email gabraf@optusnet.com.au if you wish to be sent an updated PDF guide to this area.
DISCLAIMER - Winter climbing / ice climbing on Mt Buller is dangerous and has significant potential for fatal accidents.
 While
every care has been taken in compiling accurate route descriptions for
this guide the constantly changing amount and condition of snow and ice
cover on the mountain, and / or poor weather conditions may make route
descriptions difficult to follow. The authors accept no responsibility for
any inaccurate or incomplete information contained herein, or for
difficulties with interpreting the information provided. The rapidly
changeable nature of the weather and the snow / ice cover on the routes
described means that their inclusion in this guide is no guarantee that
they are safely climbable at any given time, or by anybody. Similarly,
fixed protection is affected by the extremes of temperature, may be
located in frost loosened rock, or may not be accessible due to snow /
rime cover, and therefore should not be trusted or relied upon being
visible or usable. Winter / ice climbing requires specialist techniques,
equipment and experience. Therefore this guide has been written on the
assumption that those using it will be doing so because they have the
required equipment, skills and experience, and will be capable of making
their own assessments as to the safety of a given route and their ability
to climb it.
While
every care has been taken in compiling accurate route descriptions for
this guide the constantly changing amount and condition of snow and ice
cover on the mountain, and / or poor weather conditions may make route
descriptions difficult to follow. The authors accept no responsibility for
any inaccurate or incomplete information contained herein, or for
difficulties with interpreting the information provided. The rapidly
changeable nature of the weather and the snow / ice cover on the routes
described means that their inclusion in this guide is no guarantee that
they are safely climbable at any given time, or by anybody. Similarly,
fixed protection is affected by the extremes of temperature, may be
located in frost loosened rock, or may not be accessible due to snow /
rime cover, and therefore should not be trusted or relied upon being
visible or usable. Winter / ice climbing requires specialist techniques,
equipment and experience. Therefore this guide has been written on the
assumption that those using it will be doing so because they have the
required equipment, skills and experience, and will be capable of making
their own assessments as to the safety of a given route and their ability
to climb it.
OVERVIEW ![]()
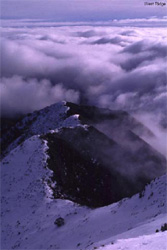
 Seen
from the three sides that most people never see Mt Buller appears as a
craggy and rugged peak. In fact from the West Ridge its steep sided
pyramid presents the most alpine profile of any peak on the mainland. On
its gentle East Ridge is a skifield where a lot of people apparently go to
ski. This is a convenient arrangement for everyone as it makes the access
to the climbs a lot easier and you can get a good cup of coffee – both for
an extortionate price though. The southern and western faces of Buller are
home to a variety of winter routes ranging from 10 to 100 metres or more,
and covering a range of situations from icicles to verglassed rock and
frozen snowgrass, sometimes all in the same pitch.
Seen
from the three sides that most people never see Mt Buller appears as a
craggy and rugged peak. In fact from the West Ridge its steep sided
pyramid presents the most alpine profile of any peak on the mainland. On
its gentle East Ridge is a skifield where a lot of people apparently go to
ski. This is a convenient arrangement for everyone as it makes the access
to the climbs a lot easier and you can get a good cup of coffee – both for
an extortionate price though. The southern and western faces of Buller are
home to a variety of winter routes ranging from 10 to 100 metres or more,
and covering a range of situations from icicles to verglassed rock and
frozen snowgrass, sometimes all in the same pitch.
This may come as a surprise to some, but consider this : The night time temperatures from about May to September are consistently at or below zero, daytime they’re at or just above. Snow falls and melts, then freezes overnight as does the meltwater and runoff from rain. All of this collecting, trickling melting and freezing takes place amongst a complex architecture of cliffs, slabs grooves gullies and corners all with varying aspects and exposures to sunlight.
 Given
this combination of shape slope climate and precipitation it would be more
of a surprise if there were no winter climbing here. There are two more
important components needed to make Buller an ideal winter climbing venue;
attitude and perception. For most people the term ‘ice climbing’ conjures
up images of vertical frozen waterfalls or classic alpine couloirs and
faces. Which is why we don’t use it. Climbing on Mt Buller is more akin to
small-scale mountaineering and probably very much more like Scottish
winter climbing. In the right conditions there is a frozen waterfall and
classic cramponing routes, but the most common arrangement is stretches of
steep frozen neve interspersed with thin mixed climbing in which the
conditions, proportions of rock snow ice and icy grass vary from metre to
metre, and day to day.
Given
this combination of shape slope climate and precipitation it would be more
of a surprise if there were no winter climbing here. There are two more
important components needed to make Buller an ideal winter climbing venue;
attitude and perception. For most people the term ‘ice climbing’ conjures
up images of vertical frozen waterfalls or classic alpine couloirs and
faces. Which is why we don’t use it. Climbing on Mt Buller is more akin to
small-scale mountaineering and probably very much more like Scottish
winter climbing. In the right conditions there is a frozen waterfall and
classic cramponing routes, but the most common arrangement is stretches of
steep frozen neve interspersed with thin mixed climbing in which the
conditions, proportions of rock snow ice and icy grass vary from metre to
metre, and day to day.
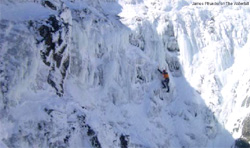
Right: James Pfrunder on The Waterfall
This is particularly so early in the season or in light snow years, but a heavy snowfall can change all of that overnight by turning a the South Face gullies into easy plods. Then a week of clear weather will turn it all back into steep blue front pointing. You just have to be prepared climb it as you see it – guess that’s theattitude bit. So endeth the lesson.
ACCESS ![]()
 Drive
to an ATM and take out lots of money. Getting to the climbing first
involves getting from the carpark to the upper part of the skifield –
specifically the broad saddle between Baldy and the summit (….if you’re
not familiar with the mountain grab one of the free run maps), and there
are a number of options in terms of effort and cost to choose from :
Drive
to an ATM and take out lots of money. Getting to the climbing first
involves getting from the carpark to the upper part of the skifield –
specifically the broad saddle between Baldy and the summit (….if you’re
not familiar with the mountain grab one of the free run maps), and there
are a number of options in terms of effort and cost to choose from :
1. A free shuttle bus service operates between the Horsehill carpark and the village, however they generally enforce a no luggage rule…..apparently rucksacks are luggage, whereas skis and bulging stripey plastic bags are not…..best try your luck early. From the village centre simply walk uphill following the line of the Bourke Street and Baldy chairs (..Blue Bullets 1 & 2…..check that run map). Keep to the right side of the runs – follow the lift line – and keep your eyes open because these are also the busiest beginner runs in Australia and therefore shit happens….often.
2. Walk up the road and walking track to the village and then as for #1…….and truly this sucks.
3. Spend $16 and get the Horsehill chair to Spurs Restaurant on the flanks of Baldy and saunter along the marked Home Trail up and around the north slope of Baldy to the saddle at the bottom of Summit Run….recommended.
Above Right: The West Ridge.
From the saddle below the summit you can traverse left across the runs – taking great care as they fang it down these ones – toward a flattish break in the broken ridge forming the far edge of the ski runs. This will put you above the gully of Fannys Finish (ski run) looking straight at No. 1 Chute on the eastern edge of the South Face. Or, trudge up Summit Run – staying left of the snow fence in the centre to avoid the slalom course – and on up to the summit. From the summit Fannys Finish or No. 1 Chute (..broad open gully descending from a few metres past summit) may be descended to reach the base of the South Face, or continue along the summit ridge, down a rocky step to a level but faint saddle. This is where the summer track from the West Ridge reaches the crest. Descending down these steep and often icy slopes provides access, by traversing back left, to The Terraces, or the Central South Face by traversing under The Terraces. The West Face is also accessed over the summit but the route will be described in the West Face section.
A cheaper approach is to walk the 4kms or so of the West Ridge from Round Hill, which is a scenic and interesting mountaineering excursion in its own right. Access is via Doughtys Rd : Turn right onto this road about 0.5km past Sawmill Settlement and then left onto a 4X4 track at the 5km mark (painted on trees). Look for an unmarked walking track on the right about150 metres up the latter just before it swings left across a small gully.
For the most part below the treeline the route is a very faint pad, although last summer (2002/3) the first 0.5km was cleared by a horse trekking mob to width that will accommodate wagon trains, or whatever fantasy they’re living underneath their driazabones and akubras. Above the treeline the ridge is often very narrow and in places a bit scrambly with some exposure…but very photogenic…the views of Buller can be quite stunning. Navigation is largely a nonissue as for most of the upper ridge you’re either on it, or just fallen off it. However, the first wandering kilometre up (..or off) Round Hill through the taller forest can be problematic in snow or darkness…despite the wagon tracks.
Allow a good 2.5 hours to the base of Mt Buller summit, and plenty more if the snow is low down, and at least 2 hours back down…..much longer if it is dark and your headtorch batteries are flat and you’re on your hands and knees in the forest looking for your upward scrapes in the rapidly freezing snow.
IMPORTANT NOTE : Quite often when approaching from the skifield you will find the area beyond the top of the Summit Chair roped off and there may be signs saying the area is unsafe due to icy conditions. This is generally because of ice or frozen snow making the extreme off-piste runs (some of which are also climbing routes) too hazardous for your average snow bunny. Unfortunately these are often near perfect climbing days as well. Currently the approach adopted by the Ski Patrol is that they don’t close the area per se, because to do so would imply that by opening access later, that the area was then ‘safe’….which it never really is for skiers. They do however give some pretty strong hints by means of ropelines and fairly blunt signs suggesting that it is not a good place to ski in such conditions. So access is generally not an issue for properly equipped climbers providing they are discreet and don’t start a stampede. Which means not striding past the signs grinning at the sheep, but perhaps quietly dropping over the north side of the ridge – out of sight – and re-emerging past the summit – out of view. Sounds a pain, but the sad reality is that resort skiers are pretty stupid. Seeing someone cross the rope line or on the summit will be interpreted as ‘it must really be open’ or ‘if they’re allowed then I am too’. Herd mentality sets in, the sheep trek to the summit and ski into situations where they don’t belong and the Ski Patrol has a really bad day.
The Ski Patrol is generally supportive of climbers and there are often mountaineers in their ranks. However, all of the areas described here are within the resort boundaries and under their jurisdiction, therefore they do have the power to close these areas to everyone if they see fit. Please respect these simple protocols, including letting them know of your intentions if passing through the village, so that continued access is ensured.
CLIMBING STUFF ![]()
The authors have climbed here continuously since 1986, but we heard about it from others even earlier - we’ve met one person who claims to have climbed on the West Face Waterfall in the 70’s. There are also frequently climbers among the seasonal staff on the mountain who have poked into many corners, and recently, but briefly, there has been some commercial instruction going on. All of these folk probably have their own route names, grade ideas perhaps, and bits of background / historical knowledge, but we don’t know any of it because we all so rarely cross paths. So we decided to collate and publish the results of our 17 years of climbing here in part as a means of unearthing other winter climbers from under their rocks and encouraging the exchange of information to help sort out the existing confusion rumours and hearsay. Thus perhaps eventually making the winter climbing potential of Buller more widely known and more readily accessible. Unfortunately, confusion rumours hearsay, and ones own closeted experiences are not the best data to base a guide upon.
So what this all means for the way we approached this guide is :
-
Mostly there are no first ascent details because it is unlikely anyone knows them, or cares that much about many of the easier lines (it would be a bit like claiming new routes amidst the jugs of Sugarloaf Pk). The exceptions being some of the harder mixed nasties we’ve done that we’re reasonably sure no-one with any sense would have been near. These are described as First Recorded Ascents.
-
There are no grades other than rare throwaway comments like ‘hard’ or ‘easy’. Bearing in mind also that how difficult some of these routes will be on a given occasion depends entirely on conditions on that day and can vary from one extreme to the other in some cases. So there are no grades
-
Few pitch by pitch descriptions are given as starting points may vary with snow cover, boldness and navigation skills - as will belays. Again, the exceptions are some of our harder mixed lines, some of which are defined by bolt belays etc.
-
For similar reasons an indication is only given as to whether a climb is a MULTIPITCH route or a SINGLE PITCH route. Multipitch routes can be up to 100 metres or so and around 3 pitches in length.
-
The names given to routes are mostly our own working names, as will be apparent from the dire lack of creativity. Possibly some of the well trodden lines may have accepted names, or other working names or numbers or whatever….please tell us if you know.
-
We have not attempted to write this in the usual rockclimbing guide format or style as the mixed up terrain and few distinct outcrops or lines mean a fair bit of description is needed for navigational reasons…..and apart from that we don’t have to.
SAFETY ![]()
Take steep rocky terrain, shove it into an alpine environment and freeze it cook it rain and snow on it, and it is inevitable there will be some hazards. Most folk with some sort of alpine experience won’t need to be told about these things, however we’re dealing here with easy access and possibly a perception that these sort of issues don’t exist in Australia…especially on a popular skifield. So to be on the safe side we decided we had to cater for the lowest common denominator….but we won’t name names.
The main hazards are described below :
Rockfall : There is active frost shattering going on amongst the exposed rocks of the summit massif, most intensely on the western aspects which is most affected by temperature extremes – here many of the ledges are piled with rubble. There is far less rubble on the southern crags, but loose rock / holds are the norm. Spontaneous rockfall does occur during freezing and thawing…..WEAR A HELMET.
Icefall : The cliffs of Buller rime up in spectacular fashion during storms, then it all falls off in the sun. Often it falls a long way and takes a bit of rock along for the ride…….WEAR A HELMET.
Avalanches : Rare, but they have occurred particularly during blizzards in heavy snow years and small slides are common in some gullies during storms in any year. However, the summit is prone to extreme winds particularly from the west to northwest and small areas of windslab commonly occur just below the summit ridge at the exits to many routes, regardless of whether any snow has fallen or not. We’re not talking valley crossing village burying stuff….but it only takes 2 sq metres to detach with you attached - a long way up - to sort of fuck up your day.
Protection : Bugger all really, so that makes it a hazard. Cracks are rare in these metamorphosed sediments and as for those that there are, well, see the note about frost shattering – treat them all with caution. Often careful searching and some ingenuity will reveal sparse protection from small wires or Friends on many of the harder routes. On most routes snow stakes can be invaluable, both for hammering into the snow, or through the snow into the mountain and tied off to make a cliff-towing mountain lifting belay. Ice screws are of little to no use on most of the mixed routes or gully routes as the ice is too thin and brittle on the former and soft to nonexistent on the latter. They may be useful on the waterfall and other larger icicles depending on the condition of the ice. Some of the more recent mixed lines have bolt runners and / or belays. However, one bolt runner and a bolt belay in 100 metres doesn’t quite constitute a sport route. Often anyway the bolts are an invisible irreleevancy buried under inches of rime….so don’t get too excited about them.
Skiers : No. 1 & No. 2 chutes are also popular extreme ski descents and this is noted again in the descriptions. Keep an eye out because it will never occur to most skiers that there might be a climber below them. They also fall off with depressing frequency and the results are never pretty. The same applies for skis, poles and assorted crap that may dropped by sightseeing skiers on the summit ridge. When walking along or across ski runs it is your responsibility as a pedestrian to stay out of the way of skiers. Keep in mind that novices probably can’t avoid you, and amidst the outcrops and drop-offs of steeper runs you may be invisible to skiers / boarders above.
Crevasses : There aren’t any…we wanted to finish on a happy note
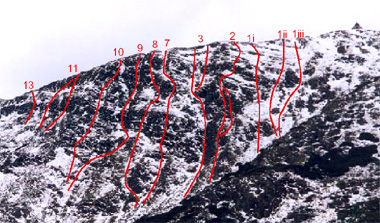
1] No. 1 Chute
Not much to frighten the horses here. Excellent introductory routes that offer steepish cramponing on a fairly reliable cover of firm snow, and with a number of possible variations. Also a popular steep ski descent…..keep your eyes peeled. MULTIPITCH ROUTE.
Starts near the bottom end of Fannys Finish (…the ski run) under the broad gully / face just left of the summit fire watcher’s hut.
i. Up on the left through a narrow and
steep chute (rock on right, snow on left) then an open face to left end of
the rock band. Over this (may be icy) and uppish. This is the overall
steepest option.
ii. Up the right side aiming for the obvious right-most chute through the
rock band (probably full of ski tracks) which is often very icy.
iii. Start left, right or in the middle, but head for the middle of the
rock band just left of the bluff forming the chute in (ii.). Often
involves a few moves on bulging water ice particularly in leaner snow
conditions.
2] 1-2 Rib
A good introduction to the harder mixed stuff and suprisingly steep in the lower half. Fortunately crampons work just as well on steep grass as snow if the cover is a little lackluster. Escape rightwards into No. 1 Chute is readily made. MULTIPITCH ROUTE.
Starts at the base of the obvious ‘edge’ that forms the far left edge of the No. 1 Chute area and the rocky right wall of No. 2 Chute, just left of a sharp blade-like outcrop. Can also be started from a little way up No. 2 Chute just before a short vertical bit where No. 2’s right wall becomes rock (this start described below).
From No. 2 Chute veer rightward over the crest of the edge, then follow ramps and snow leads between the edge and various outcrops to the right. The route stays a few metres right of the very edge, essentially following the faint rib crest that bounds No. 1 Chute. Through a rock mixed section on the crest via a nice, and hopefully icy, ‘V’ – groove to the right, or left on an exposed ramp perched above No. 2 Chute. Broad steep crest above and over rock band then up to the summit ridge.
3] No. 2 Chute
A popular line, both up and down, but more often in condition for up. Collects a climbable cover most years and the architecture can vary significantly with snow depth. In thin conditions the lower part can be awkward mixed climbing with a couple of small water ice steps. PEOPLE (note the plural) HAVE DIED IN THIS GULLY and it is the scene of frequent accidents to, and rescues of skiers….be careful. The topmost basin occasionally avalanches….be careful during and after storms. MULTIPITCH ROUTE.
Starts in the corner / gully left and below the edge described for 1-2 Rib. Up the corner and over an icy bulge where it narrows (holds and pro on right wall, belay possible below), up a few moves then over an icy shield or an ugly icy / grassy mantle depending on conditions. On up the gully, sometimes veering left to a snow arete, or straight up over a snow lip blocking the gully and into a kind of hanging bowl (told you it varies). Aim for a 4 metre black overhanging wall that appears to block the gully, where there is usually a good belay in the windscoop at the base – though the entire wall has been known to vanish without trace in a very heavy year. Left to the crest of a snow arete and around the top left edge of the wall, then up for a couple of rope lengths veering toward the centre of the upper basin and on to the summit ridge. Halfway up this final slope and to the right there are some very steep rock bands that are often impressively iced, but unprotected.
No. 2 Chute Playground
In the vicinity of the overhanging black wall halfway up No. 2 Chute are a number of short but technical single pitch routes that exit onto 1-2 Rib. These are all essentially rock routes on which the amount, nature and usefulness (..or otherwise) of fluff slush or ice can vary almost day to day.
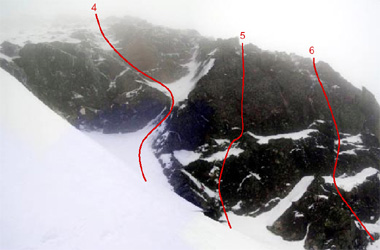
4] Triple R (Red rock ramp)
Always thin and delicate, and sometimes a good place to practice torquing and other jiggery pokery. The ramp can vary from verglas to perfect ice to powder, or the whole lot at once. SINGLE PITCH.
Starts under the overhanging black wall described in No. 2 Chute. Move awkwardly right and up from the right side of the black wall onto a usually icy slab set into the right wall of the gully to a small snow stance in its centre. Sharp left and up the narrow corner ramp perched on the top right edge of the black wall on ice, or verglass and faith. There is a short vertical orange wall on the right. A thin crack in the corner can provide limited protection and tool placements if it isn’t too bunged up, but otherwise use the bolt runner in the orange wall. Pull over the top of the ramp (exposed) into a small ‘stance’, then a stack of balancey mantle-like moves (ugly shit) over snowy grass / rock steps leads steeply to the 1-2 Ridge. Start breathing again. First Recorded Ascent : Geoff Butcher & Graeme Hoxley, winter 2000…we think.
5] Rock On
Vertical rock, good holds, scary moves….but as it is in full view of the lift queue at the bottom of Family Run try to look cool. Take your old crampons, or borrow somebody elses. SINGLE PITCH.
Starts about 7 – 8 metres below the black wall described above, at the base of a 10 metre vertical grey cliff on the right side of the gully. There is a prominent ledge at about 2.5 metres. Straight up the middle….to the top. There is a BR at half height (bracket ?) and some good pro higher up. Runts, the elderly, and the hungover can avoid the boulder problem start and use a short ice / snow ramp at the left end to gain the initial ledge. First Recorded Ascent : Geoff Butcher, 17-8-2003.
6] Layla
An awkwardly tilted rock corner running up the back of the grey cliff mentioned above. Bolted by us but we keep forgetting to actually climb it. SINGLE PITCH.
Starts a few metres right of the grey cliff by traversing toward 1-2 Rib. Somehow scratch a way over the bouldery mantleshelf sort of thing at the start and then probably scratch and slither up the corner ramp…somehow.
7] Assorted Mixed Lines
Well, we did warn you about the names ! MULTIPITCH….if taken to the ridge.
A broken rocky band rises diagonally up and left from the narrow step described in No. 2 Chute. Above is a sloping snow terrace and then another vague rocky band. A number of mixed routes have been climbed through these bands via various grooves. These are often glazed or ice filled due to melt from above. Occasionally they may be almost completely rimed and snowed up…very occasionally. The climbing is delicate and the protection sparse apart from snow stakes in the intervening snow patches. Finish by veering right into No. 2, or better, look for a steep but shallow snow gully starting 3/4of the way up - just left of the rocky slopes forming the upper left side of the No. 2 top basin. This goes directly to the ridge and makes for much nicer photos.
8] The Great Unwashed
An exciting ‘directissima’ straight up the steepest part of the South Face. Very steep and a tad committing in places, but the bolts will help you forget. Safest in firmly frozen conditions. MULTIPITCH.
Starts at the bottom. Now concentrate or you’ll climb the wrong thing. Crossing the open slopes below No. 2 Chute about level with the bottom of Fannys Finish should take you over a number of short ribs which peter out a little higher up. Crossing two of these will bring you to a very steep gully between the 2nd rib and the next rib that actually forms the boundary of the No. 2 Chute basin and the next basin. Start at the bottom of the gully.
1. Up the gully, veering left toward a
snowy shoulder on the left (3rd) rib just below the rock band. There is a
bolt belay at the base of the open stepped groove through the rock band
directly above this rib.
2. A rope stretcher. Up the groove over some steps (..often water ice)
onto the steep open slopes above. Head up and very slightly left to a
prominent left facing vertical wall with a wide dogleg crack at its right
edge. Double bolt belay. (The initial rock band can be climbed via 3 other
grooves – the most interesting being the shallow rocky corner about 7
metres right of the belay bolt).
3. Mantle over the step immediately behind the belay and up steep slopes
toward the left edge of the next rock band where there is a high bolt
runner at the entrance to a narrow (0.5m) slot. Up the slot and on to the
summit ridge. First Recorded Ascent : Geoff Butcher & Graeme Hoxley,
17-8-2003.
9] Central V – Gully
Another classic line with a crap name : A narrow well defined V-couloir when peered down from the summit ridge, but bloody near invisible from below because the perverted thing starts about halfway up. The crux can be navigating the maze of ramps and outcrops below. Starts about 100 metres left of No. 2 Chute in the next broad basin along. (This ‘basin’ is set into the base of the bristling outcrops of the central south face rather than being a broad gully like No. 2.) A thin rock band marks the top of the basin and loses itself amongst other outcrops toward the right. From the right side of the basin head for a handy gully ramp through the first rocks, then (approximately…its been a while) follow ramps right toward the very vague crest, then up and back leftish until the start of the couloir can be seen. A short sharp step of ice or glazed rock usually guards the start of the couloir (the real crux) and there may be another minor icy bit halfway up it. The last pitch up the ‘V’ can be very photogenic.
10] Central Steep Gully
A rarity for Buller – a reasonably defined line. The last pitch can be very steep and exciting when well snowed up, or very steep and unnerving when a thin crust sits on frozen snowgrass steps.
Starts in the same basin as the previous route, but toward the left side below an obvious narrow break in the rock band. Up steepening snow (or turf, or both with bits of rock) to the break in the rocks. A couple of moves on vertical water ice give access to a kind of broad hanging snow gully. On the left is a steep snow wall leading to a snow ridge over which an escape can be made to the Terraces area (see below). At the top right of this gully a narrow and steep couloir heads up just left of a rocky prow – a belay is suggested as high up as possible before entering this couloir. Steeply up the narrow couloir, an iffy belay can be made on top of the prow if you’re out of rope before the top. Watch for windslab on the exit.
11] The Cracked Block (L & R sides)
Another rarity…the short sharp crux of the left variant has good natural protection, which is a damn good thing because the rest of the route hasn’t got any.
Starts below and slightly left of an obvious cracked block seen jutting out just around the crest of the vague ridge forming the left side of the basin mentioned above. The rock band mentioned previously continues left beyond this ridge and the block is part of this continuation. Up ramp / steps to under the left edge of the block. Big tendon stretching mantle gains a ramp up the left side (ramp is loose and rubbly in thin conditions) leading to a possible stance on top. In good conditions this whole section, including the mantle move, can be a superb cascade of ice (eg. July 2002….guess you had to be there). Up the steepening snow above the block and choose a convenient groove through the next rock band which forms the flank of the summit ridge. First Recorded Ascent : Geoff Butcher & Graeme Hoxley, winter 2001.
12] The Cracked Block ( Righthand Variant)
Starts from the same spot but takes the right hand side of the prow which likewise is gained by a typical Buller step / mantle, though a less hernia inducing one than on the previous route. This variant is ‘blockier’ and has more small steps which may make it harder in thin conditions, but shaded by the prow it usually ices up faster than the previous line. First Recorded Ascent : Graeme Hoxley, solo, 14-7-2002.
13] The Terraces
Really two rock bands actually, but there is a kind of terrace or slope between them…we know what we mean. The Cracked Block is part of a band of crags to 10 metres or so extending left for maybe 70 – 80 metres before petering out near the walking track gully. Above them is a slope – quite steep toward its right end – then another band of cliffs which ‘support’ the summit ridge. The lower band is creased by numerous corners, ramps and grooves that often contain water ice, verglas, rime or snow….or nothing at all, and thus provide an interesting assortment of short mixed routes. These can be climbed by themselves as short problems, or combined with an exit through one of the steep little grooves in the upper band to give routes of around 30 metres. The snow slopes below the lower band and between the bands get quite steep (…and icier) toward the right end.
Walking Track Bluff
![]()
The West Ridge track descends diagonally from the summit ridge from a flat bit 150m west of summit (after descending a small rocky drop in the ridge). About 60 metres down it passes through a narrowing formed by a jutting outcrop and a broken bluff on the right (looking downhill), before crossing a broad steep gully (Main Street) and dropping to the West Ridge. The broken bluff between Main Street and the track is what we call the Walking Track Bluff.
14] The Straight Right
Starts at the lowest point of the bluff, which may vary depending on snow build up and drift.
Follow assorted ramps grooves and steps up the centre of the bluff to the crest of the spur above. Can also be started to the right via some shady icy slabs, but they get buried pretty early.
15] The Loony Left
Starts at the left lower edge of the WT bluff at the lower of two left leaning snow / ice ramps.
Up the sloping ramp – corner to a perch on a miniature snow arete overlooking Main Street. Step right onto very steep ground, then steeply straight up for several metres until the slope rolls back enough to allow a wander off to the right. First Recorded Ascent : Graeme Hoxley, solo, 14-7-2002.
16] Warm Up Ramps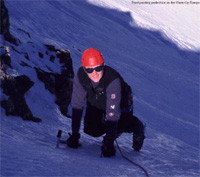
So named because they’re usually the first easy routes attempted when coming along the West Ridge, as one does.
A few metres up the very steep hillside and a bit rightish of the WTB (left of the track looking up) is a sloping and vague band of rocky stuff broken by a number of groove/ramp things. Being in the lee of the WTB spur this area often collects snow relatively early and freezes quite well. These little rocky grooves and the steep frozen snow below them provide a pleasant introduction to the more tenuous stuff elsewhere, though in some conditions they can be quite interesting in their own right. The left-most route can be continued up to another steepening and on to the spur to give around 40 metres of climbing at up to 50 degrees in a very photogenic position.
Right: Front pointing perfect ice on the Warm-Up Ramps
THE WESTERN SIDE ![]()
Just to reiterate; these crags are steep to vertical, there is a lot of shattered rock, and they face into both the afternoon sun and the winter storms. So lots of shit falls off here a lot of the time ‘wear a helmet and watch the temperature’. The Waterfall Gully after about noon on a sunny day can put on a performance akin to a WW1 artillery barrage…be very careful anywhere below the waterfall.
ACCESS
Crampons and ice axe are usually needed in ‘normal’ winter conditions… whatever they are these days. Start where the West Ridge abruptly ends at a small cliff (has a distinct ‘mini-cave’ at the base) below the summit massif. This point can be reached from the summit ridge via a diagonal descent past the Walking Track Bluff (ie. The line of the summer walking track). Traverse down and left (looking at the hill) across the base of a steep gully, under an outcrop, heading across and down to the edge of a high vertical wall. Descend under this via a steep rocky groove (often iced), across the entrance to a deep gully (Going way out, in the west), then down under the crags at the base of the next spur. On down an awkward step next to a snowgum and into a sloping alcove under the base of a high triangular cliff…The Amphitheatre.
The middle section of the Waterfall Gully (where the actual waterfall is) is reached by continuing horizontally across steep and exposed snow / grass slopes to a step or notch in the next rock rib. The snow on these slopes is usually slushy and slippery. From the notch a heathy ramp leads diagonally down below broken cliffs into the gully at the base of the waterfall.
The start of the Lower Waterfall Gully
is reached by descending the right edge (looking down) of the scrubby
scree slope close below the western faces from the West Ridge. Or, head
along the West Ridge to the first bluffs (north side, past the scree),
pick a line down the bluffs and down through the snowgums to emerge on the
clear screes opposite the start of the gully, then just kind of slither
across the rounded mossy frosty boulders.
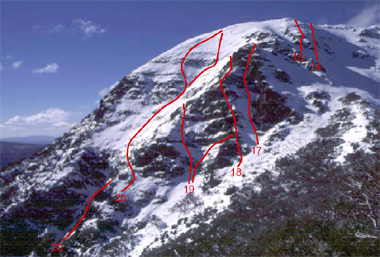
17] Going way out, in the west
One of the most prominent natural lines on the mountain. The rather ‘Scottish’ second pitch offers very steep, hard, poorly protected mixed climbing in sensational positions. Probably the hardest line here….until we get a new battery for the drill that is ! MULTIPITCH.
Starts at the base of the deep gully described in the access paragraph above. The second pitch can be reached, or the first pitch exited by a narrow ramp that slopes in from the right under the overhanging cliff that defines the right side of the gully, and marks a very definitive change in the nature of the climbing from there on.
1. Straight up the rather steep snow
gully for 40 – 50 metres to where it is very obviously blocked by a
sloping rock band. Belay in the snow scoop / ledge under the overhanging
cliff on the right.
2. Up steep ice covered slabs from the belay (easier in the centre of the
gully) to a vertical step at the base of the prominent corner (vertical
wall on right). Over the vertical bit (crux) utilising the icicle if it
has formed, and the right wall to a BR with a chain extension on the
right. Sometimes a good ice screw is possible just below the icicle, but
there is often no ice at all on the upper lip. Up snow / ice / grass in
the corner and bridge up the next vertical bit, aiming for a DBB on a
ledge where the corner ends in broken rocks (40m). May be easier to exit
right then traverse left to ledge. First Recorded Ascent : Geoff Butcher &
Graeme Hoxley, 27-7-2002.
18] Stonehinge
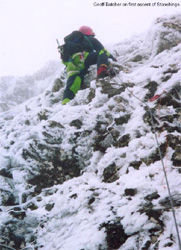 The
name says it all, but a thick cover of rime can work wonders……what you
can’t see can’t hurt you is one way of looking at it. Needs a good
blizzard to glue it all together, at which time it is quite sensational.
MULTIPITCH.
The
name says it all, but a thick cover of rime can work wonders……what you
can’t see can’t hurt you is one way of looking at it. Needs a good
blizzard to glue it all together, at which time it is quite sensational.
MULTIPITCH.
Right: Geoff Butcher on first ascent of Stonehinge
Starts at the bottom of the first pitch gully of GWOITW : diagonally left up to the crest of the stepped rock rib on the left of the gully to an obvious flat bit about 15 metres up the rib.
1. Up the centre of the near vertical
rock wall above passing two BRs at about _ and _ height respectively.
Belay at the top of the wall off snowstakes.
2. Up steeply and left to a notch at the far left end of the next cliff
and onto a tiny and very exposed stance on a blade perched above the
vertical cliffs of The Amphitheatre. Clip the BR in the notch and make a
big unbalanced step up and right….a high placement (grass is good) with
the left tool helps. Mixed climbing up and right until you can pull over
the final rock edge on rather wobbly blocks. Good belay off friends at
back of ledge.
3. Traverse left into the Upper Waterfall Gully and up through the next
cliff where convenient. (The aforementioned ‘next cliff’ of this rib –
just above this stance – has a couple of hard looking exits up rock
corners. The best is a15 metres crack corner left of the belay… First
Ascent : Geoff Butcher & Graeme Hoxley, 21-6-2003.
19] The Amphitheatre
The bottom third of this high rock face is broken into short walls seperated by sloping ledges. These walls are sometimes draped with thick cascades of water ice, and sometimes they aren’t.
i. Follow icicles and ramps up the left
edge of the lower wall (noprotection) aiming for the crest on the left
where a dubious belay might be found, or might not.
ii. About 20 metres or so up the right side of the cliff a flat ledge
comes in from the right (access from Stonehinge) and there is a bolt in
the wall above a few metres from the rib. This could be used to top rope
the ice falls below, but we haven’t got around to it…in the five years
since we put the bolt in!
20] The Waterfall Gully
 This
is the gully that cleaves the centre of this face from top to bottom and
is plainly visible from the road near Sawmill Settlement. The upper
section is like a huge funnel falling from the NW shoulder, in the middle
is a 25 metre cliff where a frozen waterfall forms, and the lower part is
a narrow chute that exits abruptly onto the screes through a 3 metre wide
slot.
This
is the gully that cleaves the centre of this face from top to bottom and
is plainly visible from the road near Sawmill Settlement. The upper
section is like a huge funnel falling from the NW shoulder, in the middle
is a 25 metre cliff where a frozen waterfall forms, and the lower part is
a narrow chute that exits abruptly onto the screes through a 3 metre wide
slot.
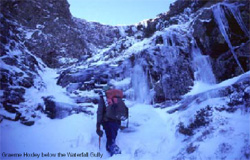
Right: Graeme Hoxley below the Waterfall Gully.
i. Lower section. This is a deep gully shaded by high walls on the left (north) that rarely sees direct sun but is fed by melt and snow/ice debris from above. A tiny rill flows down its floor over several rock steps and often freezes quite early in the season. At this time, before snowfalls and avalanche debris build up this provides a delightful and atmospheric couple of pitches with short ice steps seperated by stretches of step kicking or a ribbon of ice. The slot and short vertical step at the start often provides the crux – other times it is the near vertical 3rd step. The ice festooned crags of the middle section enclose and loom menacingly over this route – great photos, but take a helmet and choose a frosty morning. MULTIPITCH ?…well, we solo it because there are no obvious belays. Geoff Butcher on first ascent of Stonehinge
The Waterfall ![]()
 The
previous route ends on a ledge at the base of the middle cliffs. With the
right weather patterns, a substantial frozen waterfalls forms above here,
totalling around 25 metres high - including the lower slabs - and up to 2
metres thick in good seasons. Sometimes the main pillar doesn’t form, but
instead the whole wall may plastered in cascading icicles and bulges – a
situation that occurs quite quickly when there is a quick alternation of
blizzards and rain…ending with a freeze. Awkward access to the top is via
the heathy ramp described in the access notes, then up and left over iced
or wet sloping slabs. A double bolt and chain anchor is located about 10
metres above the lip, but is near impossible to find in snow. The route is
described as per the ideal conditions experienced in the early 90s….it
isn’t always this good.
The
previous route ends on a ledge at the base of the middle cliffs. With the
right weather patterns, a substantial frozen waterfalls forms above here,
totalling around 25 metres high - including the lower slabs - and up to 2
metres thick in good seasons. Sometimes the main pillar doesn’t form, but
instead the whole wall may plastered in cascading icicles and bulges – a
situation that occurs quite quickly when there is a quick alternation of
blizzards and rain…ending with a freeze. Awkward access to the top is via
the heathy ramp described in the access notes, then up and left over iced
or wet sloping slabs. A double bolt and chain anchor is located about 10
metres above the lip, but is near impossible to find in snow. The route is
described as per the ideal conditions experienced in the early 90s….it
isn’t always this good.
WARNING : Check the condition of all the pillars before climbing as it is often and quickly undermined by meltwater from the extensive sunny slopes above. Also check that the final step of the pillar has formed at all as it is fully exposed to the sun. Once thawing sets in the bombardment is continuous and can come in very big bits.
21] Gutter Snipe
A technical way of bypassing the waterfall. SINGLE PITCH.
Starts from the right side of the snow ledge described above. From here a steep narrow groove leads 25 or so metres up and right between the ice draped cliffs and the fine rock arete that bounds the gully on the right. In poor conditions it is a dripping gutter of mossy walls and slabby steps fringed with icicles, in better times it fills up and gives some quite steep snow-ice and some fun (tho’ loose) mixed climbing in the top half. Halfway up (at the first rocky step) it is possible to move right onto the arete and continue up that way. Belay at an outcrop above and right of the lip of the waterfall. First Recorded Ascent : Geoff Butcher & Graeme Hoxley, 27-7-2002.
Right: Geoff Butcher leads Main Column.
22] Heat Aches
‘Very challenging in most/all conditions’
Starts as for Main Column. Take steep
short vertical section, until just under the main column, move right and
take faint slopes to under hanging ice pillars, up steepness to
slope above.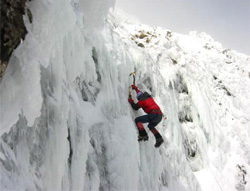
23] Main Column
Starts from the right end of the sometimes present snow ledge at the base of the lowest rocks – snow / ice / debris buildup can significantly alter this area.
From the ledge the route goes up a short vertical step on thin ice, on up steep iced slabs, then leftish over ice bulges to the main vertical pillar.
Right: Neil Monteith on Main Column in full winter conditions.
24] Wet Digits
Starts off the snow ledge 2m left off the vertical step of Main Column.
Up vertical section to icy ledge then traverse left under thickest part of the left pillar, up steepness to slope above.
25] The Upper Gully
This can be accessed via The Amphitheatre and the route to the chain belay described above. Best climbed with a good frozen snow cover when it provides an exposed but spectacularly photogenic classic. Be very careful of snow slides in thawing conditions or fresh snow as an unchecked fall over the waterfall has yet to be survived (yes, it has happened…to a skier !) MULTIPITCH.
Starts at the top of the waterfall…pretty much. Up…on steepening snow to a steep step (may be icy) in the narrows at the base of the left hand bluffs. Up and up, over some more steepish bits, depending on how much snow covers the rock bands, to belay at the base of a 5 metre cliff that bars the way near the top. This cliff is often very heavily iced but arranging a substantive belay to climb it could be difficult. Turn the cliff to the right via a few metres of steep mixed climbing where the cliff leans back and breaks up. Onwards to glory and riches…well, a nice view maybe.
26] The whole lot : A big morning out
The kind of snow cover required to make the upper gully climbable will possibly lead to the covering up of all but the final ice step in the lower gully, and the waterfall can never be guaranteed, but who cares. The former is worth a step-kicking ascent for the atmosphere and scenery, and the latter can be bypassed to the right. The whole makes for an adventurous and scenic morning out. Neil Monteith on Main Column in full winter conditions.
The Enzian Icicle ![]()
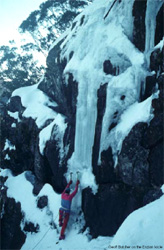 Amazing
where you find this stuff. Over near the bottom of Enzian run a 10-12
metre vertical ice smear/ icicle sometimes forms on a granite cliff hidden
in the trees. Often it is very thin, and never protectable, but there are
some good stout snowgums conveniently growing on the ledge above for your
top rope. The top of Enzian is a 2 - minute stroll from the village centre
(where the busses pull in). Cross the run on the line of the nordic trail
just below the top, passing under the poma. Down the far edge to about
level with the loading station, then sharp left into the trees and
traverse about 30 metres and it will be somewhere nearby…as best we can
remember.
Amazing
where you find this stuff. Over near the bottom of Enzian run a 10-12
metre vertical ice smear/ icicle sometimes forms on a granite cliff hidden
in the trees. Often it is very thin, and never protectable, but there are
some good stout snowgums conveniently growing on the ledge above for your
top rope. The top of Enzian is a 2 - minute stroll from the village centre
(where the busses pull in). Cross the run on the line of the nordic trail
just below the top, passing under the poma. Down the far edge to about
level with the loading station, then sharp left into the trees and
traverse about 30 metres and it will be somewhere nearby…as best we can
remember.
Right: Geoff Butcher on the Enzian Icicle.
Start at the bottom and climb to the top. On the left a short steep groove slants up to the belay ledge providing access and sometimes a brief bit of icy sport. The Enzian / Chamois area is a cold little hole that used to be known for its powder. Steep damp shady slopes surround this area and they’re littered with dank dripping granite outcrops big and small….fleeting glimpses have been caught from ski run and chairlift… ….the Enzian Icicle may not be alone. But……if you want to spend a winters day floundering around in sodden shrubbery feeding the leeches, then good luck to you
Home | Guide | Gallery | Tech Tips | Articles | Reviews | Dictionary | Forum | Links | About | Search
Chockstone Photography | Landscape Photography Australia | Australian Landscape Photography
Please read the full disclaimer before using any information contained on these pages.
All text, images and video on this site are copyright. Unauthorised use is strictly prohibited.