![]()
Sponsored By
ROCK
HARDWARE
Chockstone Photography
Australian Landscape Prints |
 Chockstone Forum - General Discussion
General Climbing Discussion
| Author |
|
|||||
3:24:36 PM |
This like all the other subjects I have written about is open to constructive additions, please feel free to add to this if you feel that somthing is missing. The first step to Solo Aiding is to get familiar with trad gear, and how to place it safely. The other equipment that is aid only, will be harder to learn/trust and will at times fail if shock loaded. the equipment I am talking about is rurps,mashies,copper heads,sky hooks,cam hooks,leapers and other marginal gear, to some extent RP's are in this same category. But as a beginer in this field I would highly recomend that you progres to these higher levels of Aid after mastering the basics on solid gear first. ei on A1 routes or as the Auatralian system goes M1, "A" bieng the American system and standing for Aid, the Australian system uses "M" for mechanical. M1 solid gear/new bolts, M2 solid gear, but with the occasional dodgy piece, or run out good gear, M3 mostly dodgy gear with the occasional good piece, M4 dodgy gear could rip out,solid belays, M5 dodgy gear and occasional hooks, solid belay, M6 mostly hooks with occasional dodgy gear, solid belays, M7 mostly hooks, solid belay, M8 all hooks off a ledge,or deck out potential, M9 all hooks including the belay, in the case of a fall certain death, for leader and belayer. This is of course open to enterpretation. feel free to list your own ladder of M grades to give others a chance to get the general idea. First lets describe the system, and the dangers. The belayer does not exist, infact you are solo,this is the greatest danger,if you come unstuck nobodys going to bail you out, remember that and prepare accordingly. Let others know where you are how long you will be and perhaps have a top rope and helper standing by the first couple of times out. The potential for falls (big ones if using the high end, eg rurps, hooks ect) will mean that a helmet is mandatory, some may argue this, but in my experience the extra gear,eg etriers,jumars,hamer,pitons,extra cams,extra wires,hooks,screamers,knee pads,water,first aid ect ect, will make you top heavy ,and more likely to invert in a fall and come in head first. So the system that I and many others use is a simple one, and will be easily used by anybody who has trad experience. The system can be broken up into its parts, belay, gear, anchor, BELAY. first you need to modify a gri gri (with time and experience you might be able to find and use a different devise) the body needs to be held up with a keeper string, find the plastic back of the gri gri and line up the part that says "made in france" on the main body, drill a small diameter hole through the middle of the plastic back exactly where the "M" in "made in france" is, no larger than the diameter of the string you plan to use as the keeper. Next cut a triangular hole to intersect the hole you have made at 90 degrees, first find the triangular shape, again in the plastic inside the gri gri, open the sliding cover and look next to the stainless axle that the cover swings open on, using the triangular shape of the plastic that is next to the steel axle as a guide, cut a triangular hole that lines up with the hole you made for the keeper string, but at 90 degrees to it. You should now be able to melt a point in the keeper string, 3mm is fine for the diameter, the string is NOT a conection more of an alighnment. Thread the string through the round hole and then out the triangular hole, tie an overhand knot in the string and cut of the point that helped get the string through,re-melt the string to prevent fraying and pull the string out the round hole to position the knot inside the gri gri's plastic body, the tighter the knot the easier this will be to do. Next allow 100mm of clean string before the loop, say 250mm total, before the knot is tied, I tie the knot ,then cut it after it is exactly how I want it,and melt the end to prevent fraying. 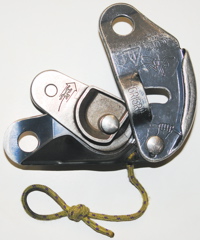 Next cut the flap of aluminium that is on the swinging cover of the unit, it is quite easy to find as it is the piece that sticks out 90 degrees to the cover, make sure that you make the finished job as smooth as possible with a metal file (I make it rounded to protect the rope from abrading against a sharp edge) 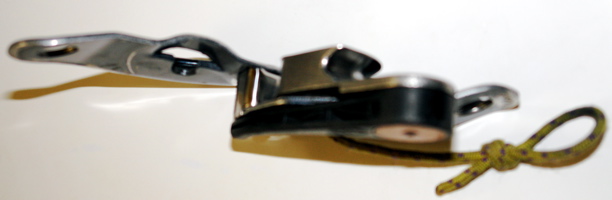 The next thing you need to get to complete the unit is a steel D malion, to conect the unit to your harness at the normal rope tie in points.(never use an ordinary aluminium biner or even a steel biner,ONLY EVER USE A STEEL "D" MALION.due to its abillity to take the load in all directions without cross loading, or three way loading. The keeper string is used to clip to a chest harness to keep the unit upright when bieng used, a regular snap link will do for this, depending on your level of paranoia, I repeat this is not a conection ,but merely an orientation keeper for the unit, but the keeper string is also great for keeping the hot devise from burning you after a long rap or lower, and keeps it from bieng dropped on multi pitch rapels,or belay change overs. GEAR well now for a brief demo on how it all works, first of all you lead off from the anchor (auto belayed) the rope is conected to the anchor in an upward pulling situation, the rope travells from the anchor, through the gear to the unit, the rope should enter the bottom of the unit at the picture of the climber, and exit the unit at the top, at the picture of the hand, and down to the coiled or flaked pile of rope that is feeding up to you as you climb higher,the rope that runs down to the anchor is the rope that gets clipped into the gear, don't clip the wrong rope (that would be bad) At the point that the rope becomes heavier on the lead side of the rope, as apposed to the flaked side, the rope has a disturbing habit of sliding through the devise and down to the anchor,due to gravity. To prevent this and as an extra safety back up some people back tie the rope to prevent the rope sliding through, in the situation that the devise fails to lock.(this is simply tieing of the rope on the flaked side of the unit with a couple of meters to play with until you retie a new knot and undo the old one so the rope can continue to feed through the devise) I use an alternate method of employing small one way auto blocks, such as tiblocks or ropemen, a french prusic will do, just before halfway, connect the prusic from underneath the gear and onto the rope, preventing the rope from sliding down to the anchor, and climb on, this will allow you to climb above half way, without the rope sliding through due to gravity. A knot in the end will also be a life saver in the advent of you climbing to the end of the rope and having it slide all the way through,leaving you on a completely solo adventure. ANCHOR Now the anchor is also very important, for many not so obvious reasons, firstly if you place some screamers on the anchor ,then this allows it to be more dynamic in the advent of a fall, if you are multi-day climbing and have a "pig" (haulbag of supplies) then this can be incorporated into the anchor as a dynamic load absorber, ie the load comes onto the pig first, then pulls the pig up as far as the slings will allow, before the anchor comes tight and takes the remainder of the load, especially important if using higher end gear, as are individual screamers on the thin gear in question. Now you're at the top of pitch one. Step one wil be to connect the rope, and make safe, then re-rig the unit for rapell. Cleaning as you descend, once at the bottom of the route then rig a jumar in conjunction with the unit for ascending, clean the anchor and attach a haul rope for the pig, or if no pig, then jug the now free line to the top of pitch one, recoil the ropes and repeat till the top. Good |
|||||
4:47:17 PM |
Nice work bomber, not much I can add to that lot. Oh yes, I use a big fatty furry rope which ensures that the Gri Gri activates. It also means that I have to self feed the rope instead of it gliding through the device but it does give me lots of peace of mind when out on the sharp end. It can be a bear when you go to do a free move though and it locks up at an inopportune time. When rope soloing be prepared to move from aid to free at any time to speed the process up. It can be scary during the transition but you can cut your times down dramatically using this method. Rope soloing can be good for putting up new routes where you are constantly working a pitch and if you had a belayer they would quickly get bored of having to belay you for hours and hours at a time. Another method for getting the pig up to the belay is to counterweight hoist it. You are on one end of the rope and the pig is on the other end of the rope. The rope goes through a one way pulley such as a Traxion or other such device. Back this setup up with a quickdraw and step off into glory. Very scary the first time you do it. For peace of mind you can attach an autoblock from your harness to the pig side of the haul line. Once the pig is at the top you jug as normal. This is a vast subject with as many opinions as there are climbers. Bomber has written a great starter piece though. Marginal placements and equalisation of same is another subject worth exploring. The wonderful art of shock minimisation is also worth exploring. |
|||||
9:06:22 PM |
Thanks phil, I did not want to go as far as distinguish between aid solo, and roped solo, this info I've given will be of benifit to both party's, and the marginal placements, and shock minimisation are really for the guy's and gal's who will be at a more indepth level of soloing, and it is another whole chapter on both counts. counter weight pig hauling is great and have been the counter weight many times on one particular route. Also I find that I am free climbing more than aiding, so tend to use the 9.8mm or 10.2 for most of my solo's, this lets the rope run smooth as silk and lets me keep up the pace. speaking of pace it allowed me to set a speed record when simulclimbing with a partner who had a gri gri rigged the same way, I led out on the multi pitch sport route with as many draws as I could carry, about 40+, and only cliped every third or fourth bolt, then if my partner stopped, I would let out some rope for my self to continue, while if I stopped to clip, my partner could yard in through the devise and not let to much slack into the system. we did ground to ground using counter balance rapell, total time for the 6 pitch climb was 56m. |
|||||
8:53:41 AM |
Nice, I like it bomber, well done. What my intention was in putting that extra stuff out there was to alert the reader to the innumerable possibilities that rope soloing gives one. I very much do like your beginners primer mate. Agree with it chapter and verse. It might be worth pointing out as well that rope soloing and aid soloing is extremely kind to ones rope. There is virtually no abrasion against the rope because it is not moving across the rock. Simply protect sharp edges and yer golden. Remember to rebelay to keep the rope where you wish it to be i/e away from sharp edges if possible. One has complete freedom of movement and one is not tied down to keeping the rope running in a straight line as rope drag is not an issue. I generally rebelay a couple of times per pitch with the long prussiks to keep the rope tensioned and to not allow the rope to slide through the device. Excellent advice on tieing the end backup knot. More than one rope soloist has found themselves to be in fact a lonely oh so ronery soloist way up there on the pointy end with no rope. Egads. |
|||||
1:28:15 PM |
An excellent rundown! On multipitch routes I also like to take a bag which acts as a rope bucket, it goes some way towards avoiding snags on the free end. Last year I picked up a Wren Industries 'Soloist' device from ebay. Perfect condition and I payed only around $60 for it. Before this my belaying method was the pain in the a...e clove hitch with backup knot. The unit has it's limitations in some circumstances such as on low angle rock but overall it's the way forward. Definately worth searching ebay for such an item. If you are looking for one, don't forget to include international sellers in your search. | |||||
1:38:39 PM |
Yeah, I got the Silent Partner and have used that on occasion too. | |||||
1:45:42 PM |
On 30/01/2007 bomber pro wrote: >The potential for falls (big ones if using the high end, eg rurps, hooks >ect) will mean that a helmut is >mandatory, some may argue this, but in my experience the extra gear,eg > >etriers,jumars,hamer,pitons,extra cams,extra wires,hooks,screamers,knee >pads,water,first aid ect ect, >will make you top heavy ,and more likely to invert in a fall and come >in head first. Not so Bomb. As you are aware of this you will be wearing a chest harness. >A knot in the end will also be a life saver in the advent of you climbing >to the end of the rope and >having it slide all the way through,leaving you on a completely solo adventure. The knot in the end should be tied to your harness. If you're not tied in basicly you're free soloing with gear (?). Backup knots are also a good idea but may be hard to adjust (untie or retie) should you go free. Just my two bobs worth. |
|||||
1:55:01 PM |
Phil, does that mean you prefer to use a Gri Gri? If so what are the benefits over the Silent Partner or the Soloist? NeverClimbed, if you have the rope end attached to your harness, how do you manage your rope so as to minimize the chance of the resulting loop catching on something below? I know some carry the rope in their pack but I've found this to be far too awkward. |
|||||
5:11:15 PM |
I wear a chest harness when on rope solo, but if you fall far enough, as in my eg, high end rurps hooks etc, then the heaviest part of you will go down first, until the rope takes up, and the chest harness starts working. have you taken a 20m+ fall? do you not know this from experience? It is burned permenantly into my memory, BIG falls take a while to forget. also I connect my self to the system with the rope on my devise, any further connection not only complicates the cliping process, but can cause snags in the loop, and thats a big drama when you have to sort that out on your own. the back up knots I use can be tied and undone one handed, and as I said I am mostly free climbing, I resort to aid if the climbing goes harder than I can. |
|||||
5:56:02 PM |
If one wears a chest harness, how is it incorporated to help catch the fall? Your description isn't too clear to me on the chest harness attachment to lead rope. I get that the chest harness is used to orientate the gri-gri, and understand that the gri-gri is clipped to the sit-harness - so does the lead rope go up through a biner at the chest harness? | |||||
7:07:35 PM |
No Ed, the chest harness is not used for the rope , just to orient the gri gri in the right direction-verticaly!, it would be no good to run the rope up through a chest harness from the devise, when the devise has the rope running down to the anchor. this would create a mini z drag in the system and would definitely affect the functionality of the devise, and would compromise the safety of the climber.(iether the gri gri would not lock, or it would jam) this is why I said that helmets are needed for this type of activity, and why you come in head first on big falls with lots of equipment on. |
|||||
8:47:41 PM |
Gri Gris are very convenient for this activity. The Silent Partner on the other hand whilst a brilliant piece of expensive engineering is quite bulky and heavy. They both have their advantages. | |||||
3:38:27 AM |
Bomber - Chest harness question answered - thanks. Anyone have any opinion on using the Trango cinch for solo aid? I don't have a gri-gri, am thinking of getting into solo aid, but wander if the Cinch is an alternative worth looking at - my net research seems to indicate it would work ok without any mods but would be good to hear from someone who has fiddled with the Cinch, either using for solo aid, or using for standard stuff. Don't like the idea of spending heaps on a gri-gri, and then taking power tools to it :o) |
|||||
9:14:42 AM |
Hi All: Just a few quick notes on my experiences. I have used a modified gri-gri, clove-hitches, stitch-plate method, and silent partner. In my opinion the most enjoyable method is the silent partner - the rope feeds very smoothly - its well worth the cost, which is only really equivalent to the cost of a couple of CAM's... Having said this I once a poor student and couldnt even aford a gri-gri. A chap mentioned an alternative method that only requires a stitch-plate. The method is summarised as follows: 1. Tie a munter hitch 2. Rather than clipping the munter hitch through your carabiner in the normal fashion, stuff the two loops of rope through your stitch-plate (as if you were clipping double ropes into the plate). 3. Clip the loops into your harness with two opposed screwgates (or a mailion) 4. Rope is feed through the system by pulling on the loop of rope that locks down on the stitch plate (clip a snap gate through this loop to give you something to pull on). All other issues such as tieing in, looping the flaked end of the rope into a carabiner to prevent back-feed through the system, anchors etc are indentical to those described comprehensively in the silent partner manual. Sorry my description is so poor - if you play about with it a bit you will soon work it out. |
|||||
9:33:55 AM |
Thanks for showing some of the potential mistakes that can happen when self-belaying. I've done a few wall routes with just an unmodified gri-gri and never realized what the problems could be. Me stupid. At least i always tied backup knots under the device at regular intervals! |
|||||
10:00:34 AM |
On 31/01/2007 bomber pro wrote: >if you fall far enough, ... , then the heaviest part of you will go down first, until the rope takes up Just to be picky, in free fall this can't possibly cause you to invert - google Galileo and leaning tower of pisa. (But I agree with the general message - there's all sorts of things which can make you invert). |
|||||
11:41:50 AM |
Actually WM to be super-picky, the heaviest part will go to the bottom because the air resistance have a bigger effect on the lighter part of you. This can be demonstrated by hitting a shuttlec*ck straight up in the air. | |||||
11:59:29 AM |
I should have said AS the rope takes up, not UNTIL. OK true enough that in true free fall all of you falls at the same rate , but when your hands come off and your feet are momentarily on the wall longer than your hands then you are heading out backwards, this gentle outward motion is not halted once airborne, and will continue to its logical conclusion. Also if any of your gear comes tight momentarily before failing, while in this backward arching swandive, then your top half bieng heavier than your legs will dictate the result. But if the gallileo google tests were done on a fully laden soloist taking a 20m fall whilst ripping gear off the leaning tower then go with those results and Ignore what I'm trying to say here. Hhmm, helmet or street pizza, tough call |
|||||
12:15:40 PM |
On 1/02/2007 bomber pro wrote: >Hhmm, helmet or street pizza, tough call Now that is the most quote worthy line i've seen on these boards for a while! I agree entierely bomber. |
|||||
12:31:32 PM |
On 1/02/2007 gordoste wrote: >Actually WM to be super-picky, the heaviest part will go to the bottom >because the air resistance have a bigger effect on the lighter part of >you. This can be demonstrated by hitting a shuttlec*ck straight up in the >air. Actually gordoste to be super-super-picky, air resistance has a bigger effect on the part of you with the most surface area presented to the direction you are falling (a 1m diameter ball of cheese will hit the ground after the olive when both are dropped from the leaning tower of pizza simultaneously) |
| There are 113 messages in this topic. |
Home | Guide | Gallery | Tech Tips | Articles | Reviews | Dictionary | Forum | Links | About | Search
Chockstone Photography | Landscape Photography Australia | Australian Landscape Photography | Landscape Photos Australia
Please read the full disclaimer before using any information contained on these pages.
Australian Panoramic |
Australian Coast |
Australian Mountains |
Australian Countryside |
Australian Waterfalls |
Australian Lakes |
Australian Cities |
Australian Macro |
Australian Wildlife
Landscape Photo |
Landscape Photography |
Landscape Photography Australia |
Fine Art Photography |
Wilderness Photography |
Nature Photo |
Australian Landscape Photo |
Stock Photography Australia |
Landscape Photos |
Panoramic Photos |
Panoramic Photography Australia |
Australian Landscape Photography |
High Country Mountain Huts |
Mothers Day Gifts |
Gifts for Mothers Day |
Mothers Day Gift Ideas |
Ideas for Mothers Day |
Wedding Gift Ideas |
Christmas Gift Ideas |
Fathers Day Gifts |
Gifts for Fathers Day |
Fathers Day Gift Ideas |
Ideas for Fathers Day |
Landscape Prints |
Landscape Poster |
Limited Edition Prints |
Panoramic Photo |
Buy Posters |
Poster Prints